
More and more people are pressed by the need to create a WordPress menu for their sites. This is justified by the ever-increasing number of websites that exist today. The WordPress menu of a site is in fact the list of pages that are usually displayed at the top of the site.
It is essential for website owners, as it allows visitors to easily navigate between the pages of the site. No matter what kind of website you want to design with WordPress, such a menu is necessary to make the content of the website accessible to its visitors. But, how do you go about it? This guide presents the essential steps to create a WordPress menu. All the information is included for an optimized menu, which will allow visitors to get the information they need.
Characteristics of a good menu
Remember that WordPress is a tool to create and manage a website. Being a Content Management System (CMS), it is used for the publication and management of contents on the net. It allows to design any website: information website, showcase website, e-commerce store, social network, extranet, web-tv, etc. As a result, it allows site owners to create a WordPress menu using a graphical interface. To this menu, they will be able to simply add items according to their needs. Better yet, it is also possible to reorganize the items of an existing menu by a simple drag and drop.
Note that the menu of a site is the entry point for the navigation of users of this site. It must therefore be well cared for. For this, the menu must respect three characteristics. First, the menu must have a limited number of items. Second, it must have concise and clear headings. Finally, a good menu should have a very limited number of sub-menus, if any. This does not exclude the fact that there may be exceptions. Moreover, the cases differ from site to site, especially with regard to sub-menus.
However, generally, especially for a small website or a blog, it is recommended to make a less busy menu. The reason is simple and clear. Indeed, the more items there are on the menu, the more options visitors will have to choose from. As a result, they will spend too much time thinking about the right item to click on. Eventually, they will look elsewhere, and the site will lose visitors. It's pretty much the same as in a restaurant. The longer the menu, the harder it is to choose.
Menu configuration options in WordPress
The way WordPress works, there are two options for creating and configuring a WordPress menu.
1st option: the classical method
Usually, the first intuition of menu creators is to go through Appearance > Menus. This is a good option for creating a WordPress navigation menu. However, following the Appearance > Customize course, we come across the site customization tool.
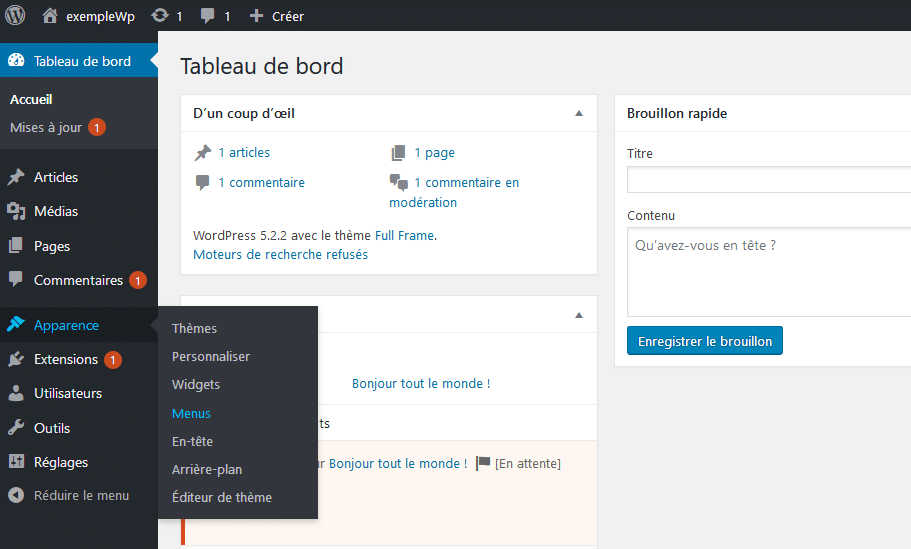
The latter includes an element: "Menus". Clicking on this element brings up a different and more intuitive menu creation module. The advantage of this method is that it gives access to a preview of the actions on the site in live.
2nd option : The navigation block
The "Navigation" block is one of the new blocks that appeared with the advent of the Site Editor. This block has a functionality that allows you to have control not only over pages and posts, but also over each part of the theme. It also allows you to create and manage navigation menus.
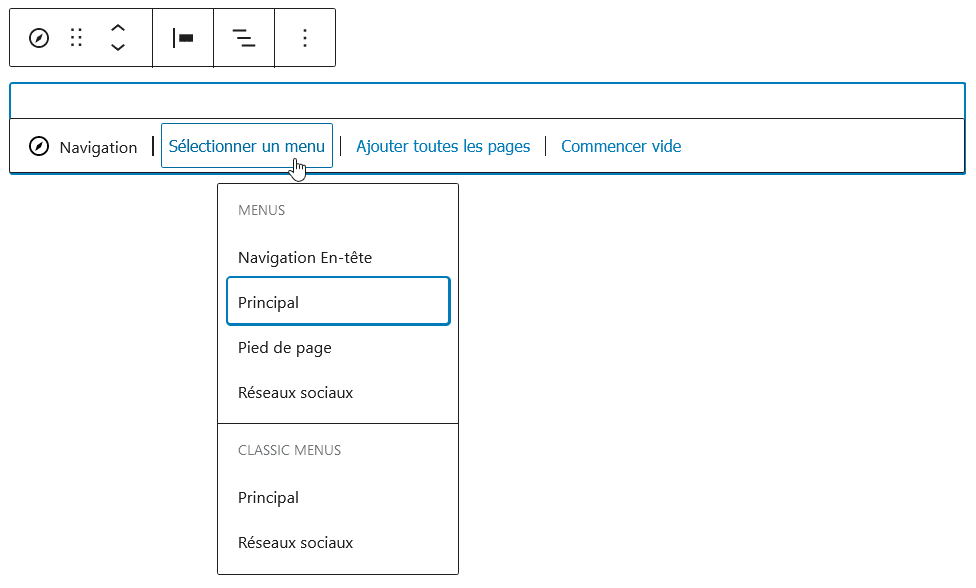
However, to use this editor and benefit from its advantages, it is necessary to activate a few points beforehand. These are a block-based theme and another theme that supports template editing. With the latter, it is possible to access the site editor by going to Appearance > Editor.
In this case, the options of the customization tool are hidden. Next, you will need to add the "Navigation" block, as would have been the case with other content blocks. These are the "Image", "Title", "Buttons" blocks, etc.
How to create a WordPress menu?
Creating a WordPress menu is not that complicated. The creator can choose between the two methods mentioned above. In case he prefers to use the classic method, this guide presents the essential points of this method.
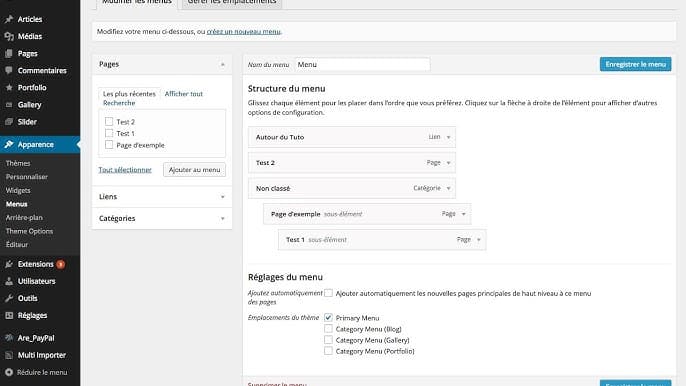
First, it is necessary to go to the "Menu" page contained in the "Appearance" section (1) in the administration interface. This page contains several fields for the creation of a menu for those who do not yet have one.
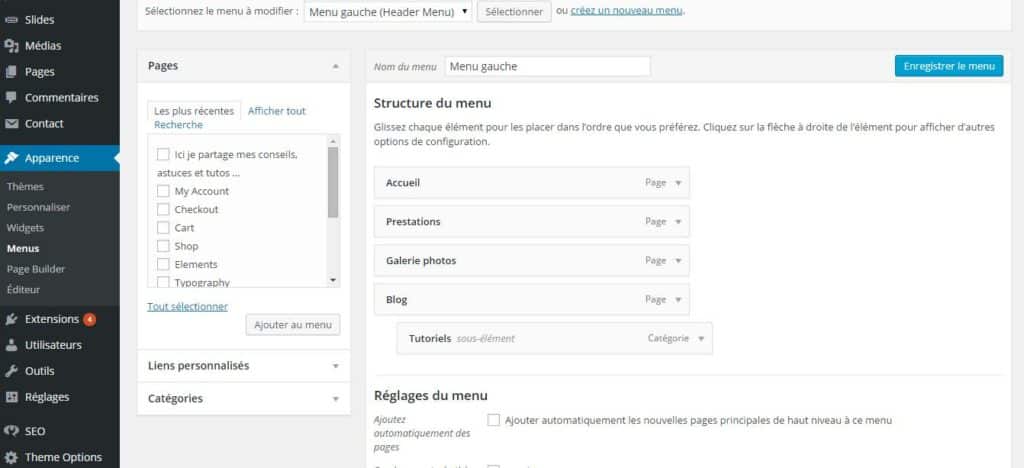
At this point, the creator can click on the link "create a new menu". Then, he will name his new menu in the "Menu name" field. He will also have to choose among the proposed locations in "Display location".
The main location represents the menu located at the very top of the WordPress site. As for the "Footer Menu" location, it is the menu located at the footer for each page of the site. After this step, the menu creator will just have to click on "create menu". This is the last step to add a new menu to your site.
Adding items to the WordPress menu
After creating the menu, it is important to add some elements to it. These items will not only be pages, but also items that visitors can access from the menu. For this purpose there is a column "Add menu items" containing various sections. There are the sections " Pages ", " Articles ", " Custom links " and " Categories ". Adding these items is very important for any site owner who wants to create an optimized WordPress menu. This column is located on the left side of the menu structure.
There is also a section called "WooCommerce Terminations". However, it is only available for people who have WooCommerce installed on their WordPress site to turn the site into a store.
From the sections listed in the menu items column, the menu creator must go to the section that interests him. Then, he/she will have to select the box of the item he/she wants to add to the menu, and then click on "Add a menu".
For example, if you want to add the item "Articles", you will proceed as follows. First, he will click on the check mark to the left of the "Articles" item. Then, he will just have to click on the button "Add to menu" so that this page is added to the menu. Finally, to validate the modification, he will have to click on "Save menu". This will allow him to save the menu.
Other possible elements
In case the creator does not find the desired element in the section of elements to be added, the tab " See all " will be of great help. In this tab, he will see all the recent or not elements of a section.
Moreover, the "custom link" element is different from the other elements. Indeed, to add a new element of this type, the creator must enter a URL and also a text to display. Therefore, it will not be a matter of simply clicking on a check mark as for the elements of the other sections.
For example, if you want to add the "My Account" page to the menu, you will have to enter the URL of this page in the "URL" field. Then, he will have to enter the text to be displayed in the menu on his WordPress site in the "Link Text" field.
However, the purpose of this process is the same as in the previous cases. The creator of the menu will only have to click on "Add to menu" and then on "Save menu". Thus, he will add the item to the menu and save the changes to the menu.
Hidden options in WordPress menus
Some WordPress menu options are not directly visible. These options are varied and play different roles.
What are the hidden options of the WordPress menus?
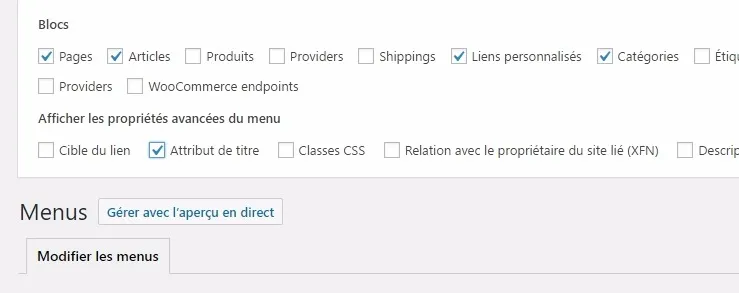
WordPress marks some of the possibilities of the menus as default. This is a real asset for all users in general and for beginners in particular. For users, because it provides clarity and for beginners because it allows them to avoid bad actions.
The jog wheel in the Appearance > Customize > Menus section displays these options:
When these boxes are checked, new fields appear within the menu items. Title abuse, link target, CSS classes, link description and relationship to the owner of the linked site are these fields.
What are these options?
The different options presented above each play a specific role:
- Title Attribute: The title attribute is used to display "a description of a menu item" on mouseover. Thus, its usefulness is reduced and so far, it is used in a very limited way.
- Link target: It allows you to display a box in order to open the destination page in a new tab. In case of an external link, checking it allows to keep the users on the site for a longer time.
- CSS classes: they are useful in customizing the appearance of a menu item.
- Description: There are themes that allow you to display a description below the menu title. However, these themes are rare.
- Relationship to the "Linked Site Owner" (XFN): XFN properties are useful for an owner who wants to specify the relationship between them and their site. However, these properties are not required.
Organization of menu items?
The ability of WordPress to rearrange menu items is an inescapable advantage. The method is simple. In an existing menu, click on an item without releasing the click. Then drag that item up or down in the menu. On the other hand, it is possible to preview the location of the selected item with the help of a dotted box, indicating this location. The click can be released after that.
Creation of sub-menus
It is also possible to create WordPress submenus. All you have to do is move elements (one or more) under another element. To do this, you will have to perform the same manipulation as before. However, the element held under another element must be dropped so that it is slightly shifted to the right.
This method will create a sub-menu with a consequent hierarchy. The selected item is considered a "child" of the item below which it will be positioned. To ensure the correct positioning of the selected item, the "menu creator" can use the dotted box as a guide. To be precise, the menu creator can be a developer or not.
In fact, the dotted box will be positioned further to the right than it should be. It is also important to save the changes. Be careful, this is a step you should not forget. As usual, just click on the "Save menu" button.
How to make adjustments to your menu?
It is important to make adjustments to the menu after adding all the essential elements to it. This is an important step to create an effective WordPress menu. To do this, it is necessary to go to the "Appearance" section and then to the "Menu" page. Then you need to go to the section dedicated to "Menu Settings". This section is located under the menu items.
At this level, there is a proposal of several boxes to be checked:
- Automatically add pages: by checking this box, the pages previously created in the menu will be automatically added. Such an action is not really interesting, because it does not allow you to have a personalized menu. It is therefore best to avoid checking this box.
- Theme location: The boxes here allow you to determine where to display the newly created menu. One of these boxes must be checked for the menu to be displayed on the site. In addition, the location headings will be different depending on the theme of the site. Therefore, it is important to find a box specifically for the main menu.
When the settings are configured, the menu creator must click on the (blue) button "Save menu". This will activate the new menu. When the menu is no longer needed, it can be deleted by clicking on the link on the bottom left.
Management of the menu locations
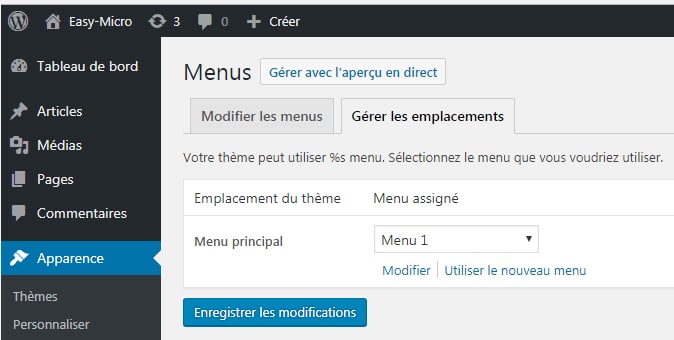
This step concerns the second tab on the "management page" of the WordPress menus. This is the " Manage Locations " tab. This tab allows the menu creator to assign previously created menus to the different locations proposed by his theme.
It allows him to see at a glance where the menus are displayed. Moreover, this is possible directly with the "Manage with live preview" button located at the top of the tab. It is also possible to change the menu for a given location using the drop-down menu.
If, on the other hand, the menu creator wishes to create a new WordPress menu, he will click on the "Use new menu" button. They will be taken to the associated menu editing page with a click on "Edit". As soon as all the menus are in their place, all that's left to do is save the changes.
How to place menus in other locations on your WordPress site?
In addition to the locations proposed by his theme, the menu creator has the possibility to insert menus elsewhere. He can insert them in the sidebar of the site if his theme offers them. It is also possible to insert them via the "Navigation menu" widget, in the footer.
To do this, it is necessary to create a new menu without assigning it a location. Then, in the "Appearance" section and in "Widgets", add a "Navigation Menu" widget to the area of your choice. You will have to write a title and then select the menu that will be displayed in the widget.
Finally, you will have to click on "Save" to put this new menu into use. However, this manipulation is optional. Also, chances are that the other locations (default locations of the theme) will suffice.
Creating a WordPress menu: in brief
Creating a WordPress menu has great benefits for the site that has it. It allows visitors to easily find their way between the pages of this site. However, this creation follows a whole process. The creator can choose between two methods that have the same purpose, although different from each other.
Once the menu is created, it is necessary to add some elements through which visitors will be able to access the contents of the site. It is also important to organize the elements added to the menu. The settings as well as the management of the menu locations are important parameters for an optimized menu. Finally, it is possible to improve WordPress menus with a plugin or an extension designed for this purpose.