To create a social network with WordPress, BuddyPress is a simple, effective and free solution. Discover in this article the extension that could make any community site pale in comparison.
What is BuddyPress?
BuddyPress is a plugin that allows you to design a social network with WordPress by putting together a set of components to create a real community space.
With BuddyPress, visitors to a website can register, create a user profile and publish any message via a Facebook-like activity "wall". Adding other members to a list of friends is made possible, as is the creation or integration of public or private groups. BuddyPress includes an internal messaging system and, thanks to its compatibility with the bbPress extension, users of a site can exchange and discuss topics on a dedicated forum.
The BuddyPress plugin is suitable for any kind of project. For companies that want to develop an intranet site, small or large, BuddyPress is the ideal tool to create a real internal communication place for their employees. Freelancers and influencers will also be able to gather their communities on a single network to animate them easily with the features offered by BuddyPress.
In addition, since version 1.7 of the plugin, BuddyPress integrates perfectly with any WordPress theme. If you're looking for a "social network" design that will work with BuddyPress, a handful of specific themes are available for download at WordPress.org or from various merchants.
How to install BuddyPress?
Now that you are convinced of the usefulness of BuddyPress to transform your WordPress website into a community space, we will proceed to its installation and configuration by presenting you two different methods: the installation with the WordPress interface, and the download.
Install BuddyPress through the WordPress interface
To install BuddyPress on your WordPress site as easily as possible, you will need to go to the WordPress interface to download the extension.
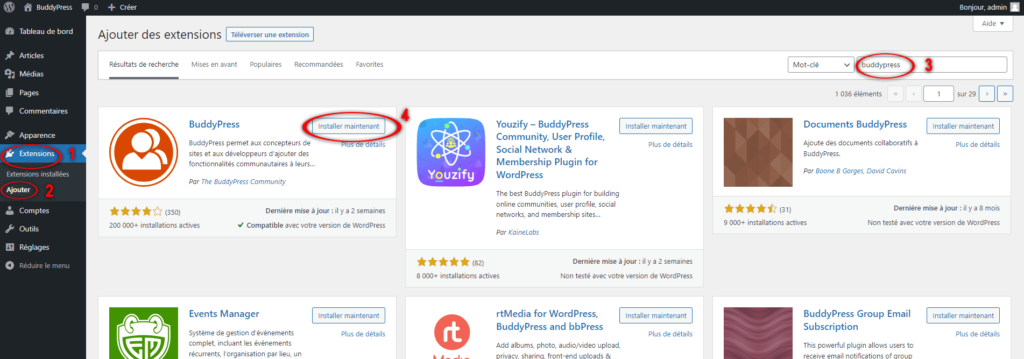
- To do this, go to the Extensionssection(1) of your WordPress site, then Add(2).
- In the search bar (3), enter the name of the plugin you are looking for: BuddyPress.
- The search results will display a list of plugins. BuddyPress will theoretically be placed in the first position. Click on Install now (4).
- After a certain amount of time has passed, click on theActivate button that appears to activate the BuddyPress plugin on your WordPress website.
BuddyPress is now ready to be configured on your website!
Before going any further, let's look at the televersion method offered by WordPress and its benefits.
Upload BuddyPress to your WordPress administration
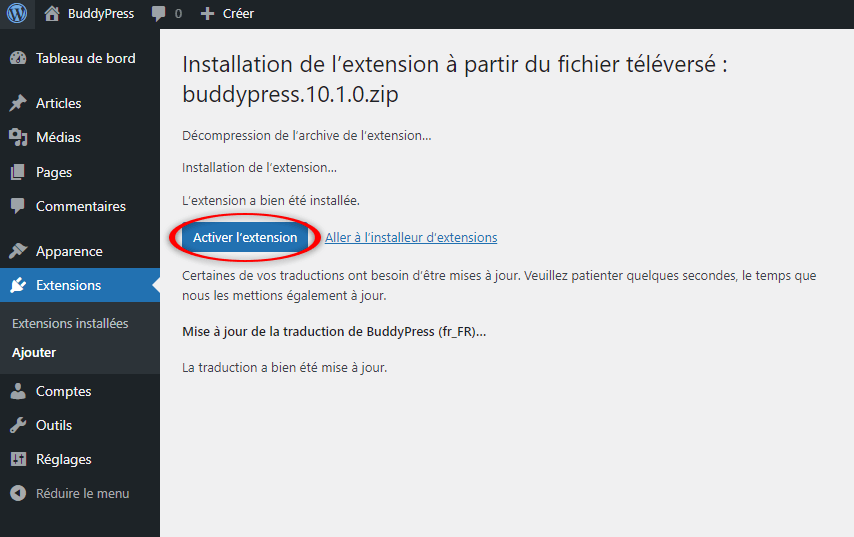
The second way to install BuddyPress is to retrieve the plugin installation folder and "upload" (or download) it to your WordPress site in the Extensions section. This procedure is useful for plugins not referenced by WordPress or for installing earlier versions.
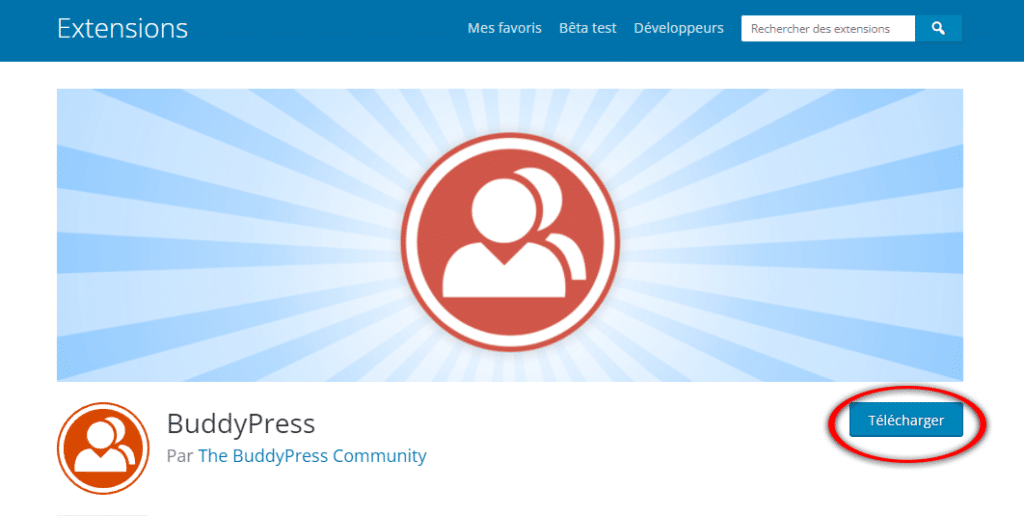
First step: go to the Wordpress.org Plugins section and search for BuddyPress. Then click on the Downloadbutton to get the file in .zip format.
BuddyPress is also available for download on the official website from the developers of the plugin. Prefer the stable version of the software rather than the development versions to avoid unpleasant surprises that can compromise the stability of your WordPress website.
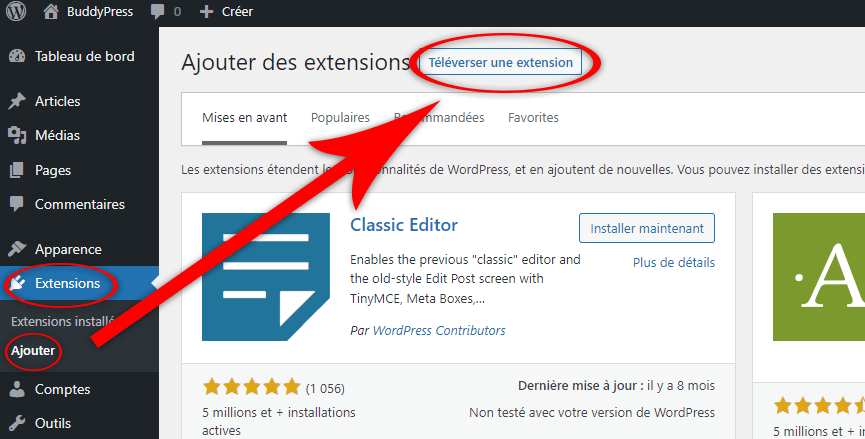
Once you have the .zip installation folder, the second step is to go to your WordPress admin panel, Extensions section,Add then Upload.
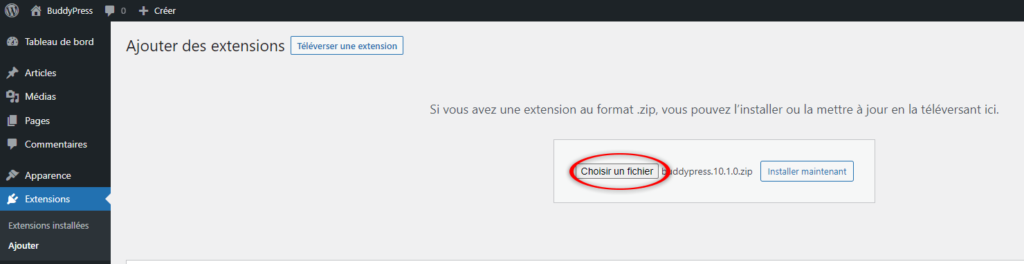
A pane appears to download your .zip archive. Click on Choose a file, find your BuddyPress folder in your computer, validate and finish the operation with Install now.
Finally, activate the extension to complete the BuddyPress installation.
First configuration of BuddyPress
BuddyPress is now installed and activated on your WordPress site. The first thing you need to do before you start building your social network is to set up BuddyPress properly to get off to a good start.
The configuration interface accessible under the Settings section of your WordPress admin panel consists of three essential tabs:
- BuddyPress components (or features) that can be activated ;
- The options for setting up the plugin ;
- The creation and assignment of pages that BuddyPress will use.
Let's take a look at each of them.
Preliminary stage: opening of registrations
Before starting the configuration of BuddyPress, you have to determine, depending on your project, which visitor profile will be able to register to your website.
If you don't plan to make signups open to everyone, without any special requirements, skip this step and move on to the next. Otherwise, enable public registration in the WordPress admin panel, Settings > General tab , and check the registration box.
Activation of BuddyPress and its components
BuddyPress has features called "components". By default, some of them are enabled: extended profiles, account settings, activity streams, notification options, BuddyPress Core, and Members. Note that the last two components listed are not deactivatable; they are necessary elements for the plugin to work properly.
Depending on your needs and expectations, you can activate the components you want. These include:
- Extended profiles - activation of customizable profiles ;
- Account Settings - allows users of a site to change their account and notification rules;
- Friendsconnections - allows you to add users to your friends list;
- Private messaging - activation of private messaging on the website;
- Activity stream - displays the activity of your contacts in a Facebook wall-like fashion;
- Notification options - notification settings ;
- My groups - create a public, private or hidden group;
- Blog Tracking - tracks all new articles and comments posted on your site;
- Members - activation of user profile spaces.
Interesting, isn't it? We didn't lie to you. BuddyPress is really THE plugin that will turn your WordPress site into a real social network. We'll come back to these features in detail, because before that, we have to look at the pages BuddyPress will use.
BuddyPress page configuration
The Pagestab defines the pages on your WordPress site that are associated with the components. In order to unleash their full potential, components require a dedicated space.
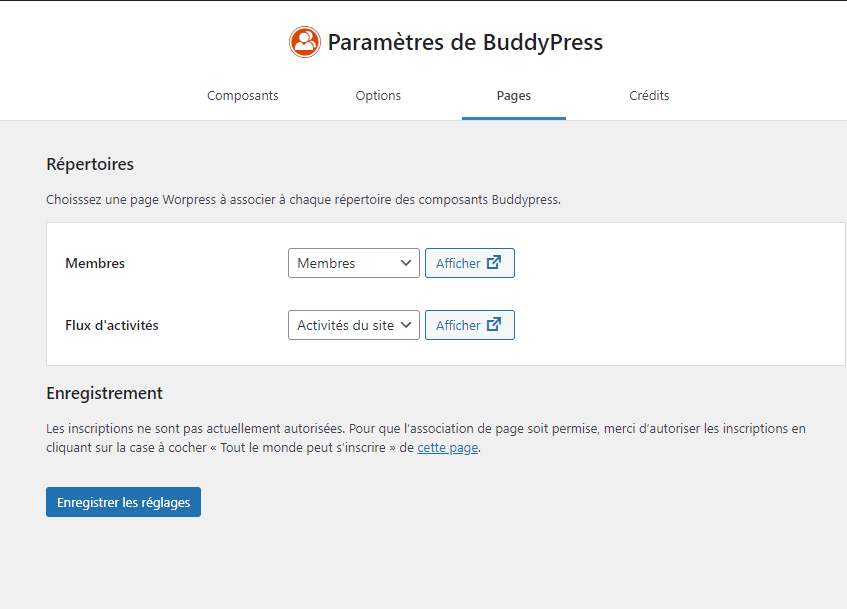
By default, the configuration interface looks like this if you have made registration possible for everyone. Note that the number of configurable pages will change depending on the components you have activated.
If for any reason you want to create a page manually and assign it to a BuddyPress component, click Pages > Add in the WordPress sidebar, name itwith a title, and save it. Then simply go back to the BuddyPress page settings, select the page you created, and commit the changes.
BuddyPress options
Last step of the first BuddyPress configuration, the options. This is where you will set up the BuddyPress components activated on your website.
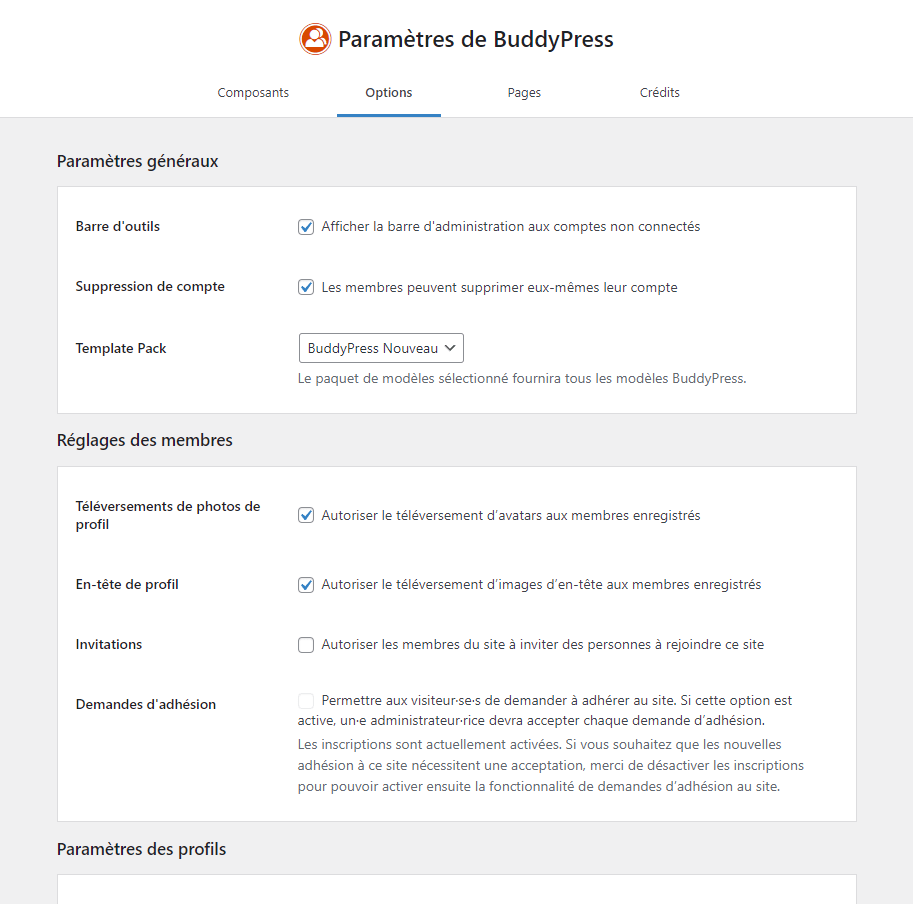
Each parameter is well explained. It is up to you to select the most relevant ones according to your project, your needs and expectations.
For websites that don't want to make registration available to just any visitor, the Membership Requestssetting in the Member Settingscategory enables the need for an administrator to validate every request received. This is the perfect option for internal company community sites!
Your social network with WordPress now has these first configurations to work well. As it evolves and components are activated, don't hesitate to go back to the BuddyPress settings to adapt them.
Overview of BuddyPress
This overview aims to introduce you to the different pages you will encounter with BuddyPress. For this overview, we will use the BuddyX which will influence the appearance of the pages presented. Furthermore, we have activated all the components offered by BuddyPress for a complete presentation.
The profiles
Like any social network, your users have a public profile. On this page, which works like a dashboard, your site members have access to different tabs and features depending on the BuddyPress components activated:
- Recentactivity ;
- Their profile information ;
- Recent and archived notifications ;
- Private messaging ;
- The list of friends ;
- Groups joined or created;
- The settings of their user account.
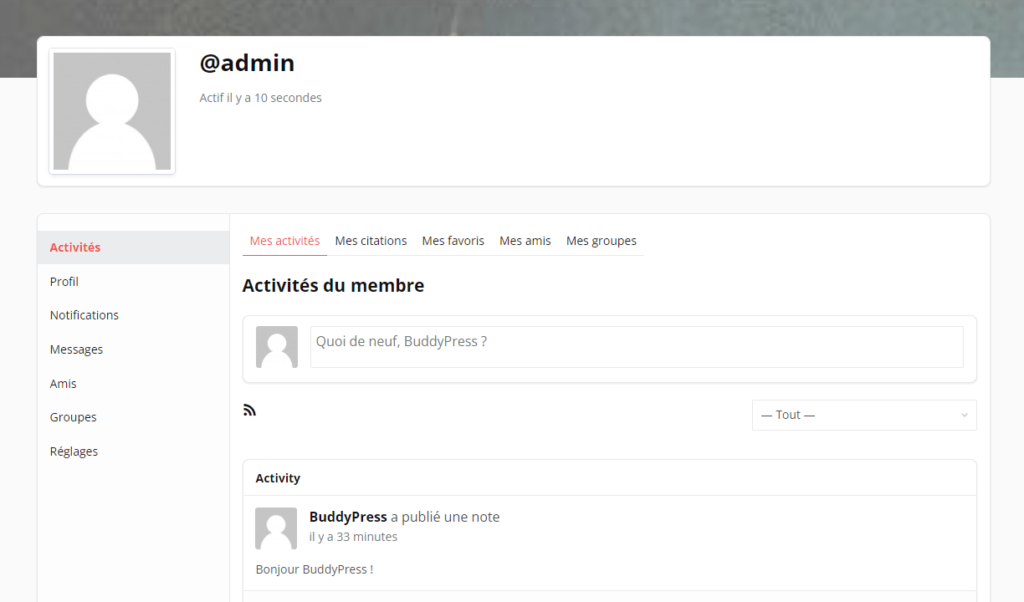
Any changes to a user's profile, photo, cover, or any news or comments posted on the site are listed in Member Activities.
Site activities
The Activities page of the site lists all the activities related to your registered users. It is a dashboard accessible to all through which it is possible to consult the news of all members, friends and groups while reacting with comments and favourites. It is through it that a user can post a message that will be directed to their profile or to a chosen group.
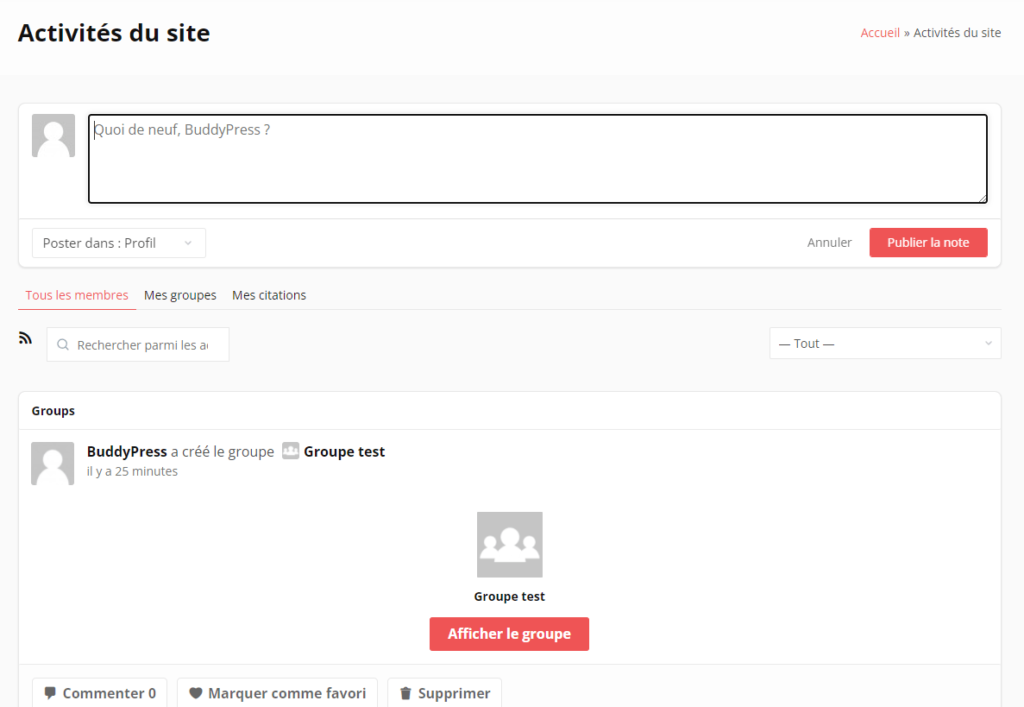
On the WordPress administration side, all these activities can be found in the Activities tab. As an administrator or moderator, you can view and moderate any of your registered users' activities.

Members
The Members area lists all the users registered on your website. Accessible to all, the profiles displayed can be filtered according to their connection status, their recent registration, or by alphabetical order. In the latter case, all the profiles of registered members will appear in the results.
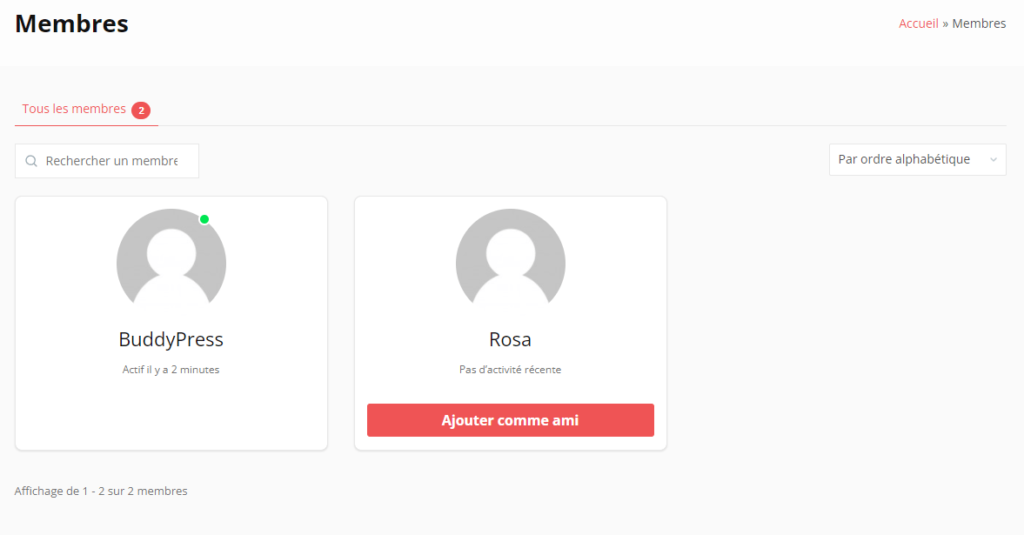
For administrators and moderators, BuddyPress adds new tabs in Accounts to manage registrations, profiles, profile fields and ranks given to members.
Registration and Activation
Registration and Activation are two pages that concern visitors to your site who want to register.
On the registration page, a user is invited to fill in a form that includes a login, an email address, a password, and information about his profile. Depending on the fields you have set up in the BuddyPress administration, some of the requested information must be filled in, and others can be made optional.
The Activation page allows you, as a newly registered user, to activate your account with a key received by email. Once activated, your new member can take full advantage of the features of your social network created with WordPress.
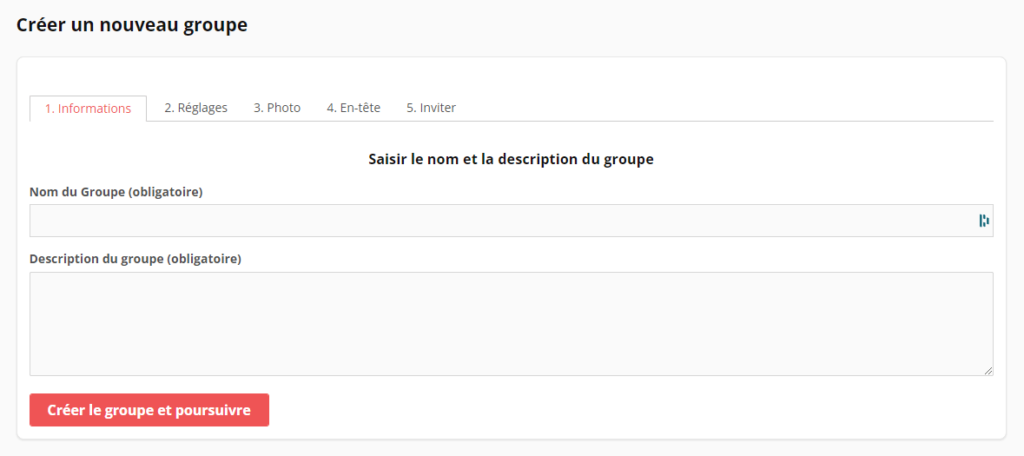
Groups
The Groups interface lists all the groups created on the website and allows a logged-in user to access those of which they are a member. As in the Members area, it is possible to draw the groups displayed with several filters: recently active, most members, newly created and in alphabetical order. This is also where a member of your site can create a group if you have enabled the option to create for all.
Groups can be set up as public, private, or hidden. For a public group, any registered user can join it. The activity of this group is displayed in theActivity streamof the site and is viewable by all members of your website.
A private group requires a membership application from registered users to gain access. Private group activity is only displayed in the Site Activities for members of the site.
Masked groups are accessible only by invitation. The activity of this type of group is private and can only be consulted by its members.
Finally, as an administrator and moderator, a Groups tab appears in the administration panel to manage them.
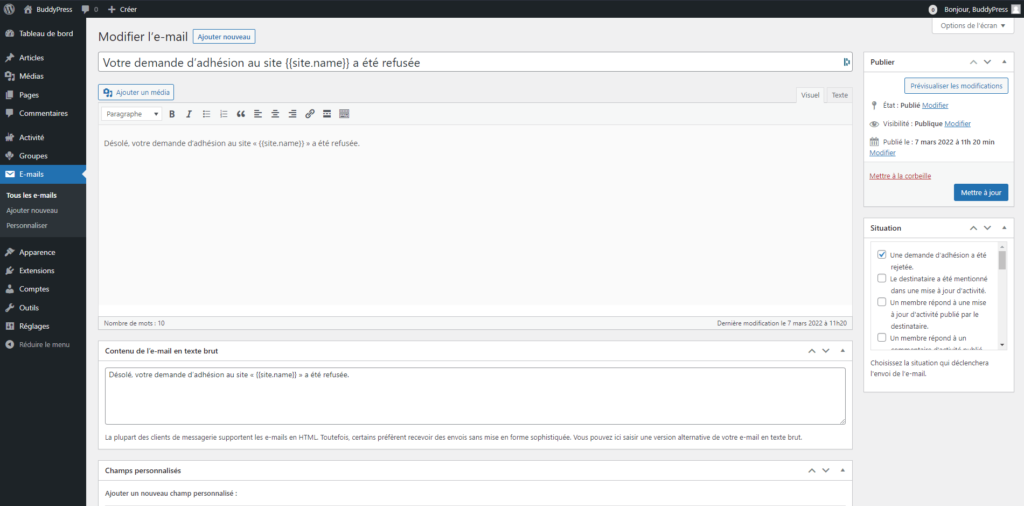
The emails
To finish this overview of features, BuddyPress integrates the customization of emails sent to your users concerning their activity on the website. It is easily possible to modify the default ones, delete them or create new ones. Enter the title of the email, its content, and configure the situation for which it will be sent.
Email customisation can be found in your WordPress admin panel, left sidebar, email tab.
BuddyPress components
As previously seen during the first configuration of the plugin, BuddyPress has a total of 10 components, 8 of which can be activated at will, to offer all the power of a social network.
Extended profiles
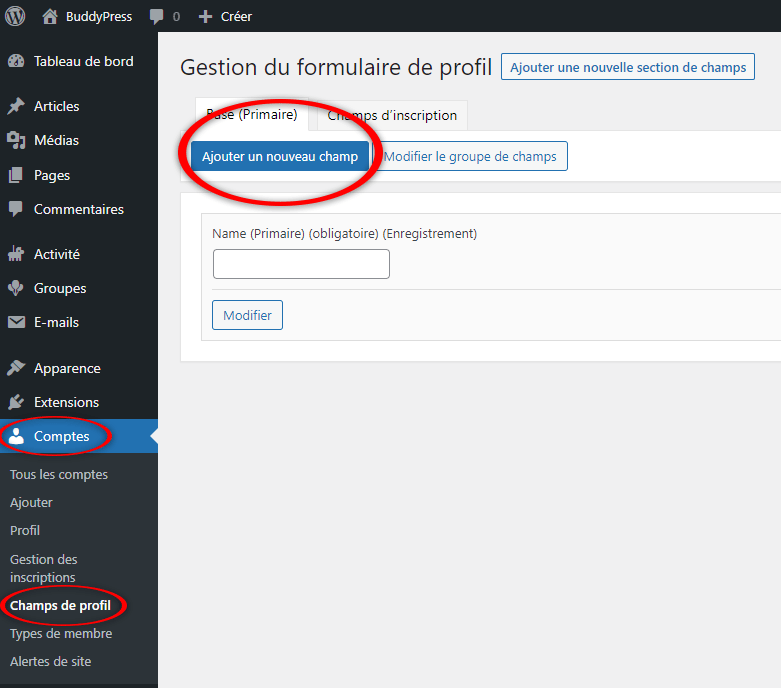
The Extended Profiles component adds fields of information that your users can fill in to complete their profile, such as age, gender, or country of residence. These are determined by you in the WordPress admin panel, Accounts > Profile Fields section.
Each field created is given a name and description, as well as a type (text, numeric, checkbox, etc.) and an optional or mandatory condition. Other settings define whether this field will appear in your site's registration form, for which type(s) of members it can be filled in, and whether the visibility of this field can be modified by your users.
Account settings
To give more control over your users' account settings, the Account Settings component adds email notifications, determines the visibility of profile information, and restricts group invitations to friends only. To comply with the RGPD law, your members can export their personal data through their project to view it at any time.
These settings are accessible from a user profile.
Connecting with friends
The Friends Connectionscomponent activates the friends list and contact requests of your website. Your users can add other members to their contacts and see their respective activities.
In addition, a registered user can make some of this information visible only to members of their friends list. To do this, the member must go to Settings > Profile Visibility on their profile to determine what information is available to their friends.
Private messaging
The BuddyPress private messaging system allows, like any messaging system, to send and receive messages from other registered users of the website. A private message can contain images and links, and can be sent to several recipients.
Activity flows
As previously mentioned, the Activity Feed component creates a dedicated page that lists all the global activity of your website members. Through this, they can react to publications with a comment area, bookmarking and mentioning other users.
This activity stream can be followed by RSS feed and email notification.
Notification options
By enabling this component, your members can set their preferences for receiving notifications about site activity that affects them. Notifications can be received by email and/or displayed in a bubble in the website menu.
My groups
My Groups makes it possible to create and use public, private or hidden groups. These dedicated spaces are designed to encourage the exchange of information and discussions between members of your site around a specific theme.
Blog tracking
The Blog Tracking module allows you to display, in the Site Activities, the new articles and comments published on the blog space if your website has one.
If you want to start blogging, please refer to our dedicated tutorial Create your blog with WordPress.
BuddyPress Core and Members
All you need to know is that these two components are essential for BuddyPress to work properly. They are also the only two that you cannot disable.
Go further with BuddyPress
BuddyPress is full of features and plugins dedicated to make you the next Mark Zuckerberg. It's impossible to detail them all in one article, but it's interesting to know about some possible extensions.
First of all, in terms of protection and security, BuddyPress fully supports the Akismet plugin since version 1.7. Akismet Installed by default on all WordPress sites, this plugin checks comments and all contact form submissions toprotect your website from spam and malicious content. Simply enable it in Extensions > Installed Extensions in your WordPress admin panel.
If groups are not enough for you, you can install a forum with the plugin bbPress. Free and lightweight, the extension integrates perfectly with BuddyPress and extends the functionality of your BuddyPress social network to promote interactions between users.
To further the social aspect of your WordPress site, you may want to consider adding an instant messenger. This is what the plugin WordPress, BuddyPress Users Chat Pluginplugin, an official paid extension of BuddyPress. Once the plugin is installed, your registered users can chat instantly with any other site member. A Messenger integrated to your BuddyPress site: practical!
Whatever your desires and projects, the power of BuddyPress combined with the immensity of the WordPress ecosystem will be able to answer them. Take the time to find the perfect extension to make your social network unique. If you can't find what you're looking for among the 59,544 WordPress plugins on the market at the time of writing, turn to the professionals who can easily turn your ideas into reality.
By the way, if you had only one option to add to your WordPress social network to make it unique: which one would you choose?