Whether you are a company, an association, a freelancer or an influencer, you have value to bring to the world. In the digital age, discussing your passion or project, and promoting your product or service has never been easier or faster.
However, the first results are not forthcoming. Your showcase website and social networks are not enough, and you are thinking about expanding your horizons.
If you are looking for visibility, traffic or new customers, it is essential to optimise your online presence. To do this, blogging is one of the most effective solutions available to you.
What is a blog?
A blog is a space on the web dedicated to the creation of content on one or more themes of expertise. Like a newspaper, a blog allows companies, entrepreneurs or influencers to generate traffic around their activity by putting together written, visual, audio and video content.
An excellent means of expression to increase visibility, the blog allows you to get closer to your target audience and readers by creating a feeling of proximity.
Are you an individual with a YouTube channel and social networks focused on film criticism and want to put it all in one place? Why not create a blog?
Modular and customizable at will, a blog is the perfect web structure for any type of profile:
- for individuals who wish to share their passion with the rest of the world;
- for entrepreneurs who want to acquire new prospects through the creation of high value-added content;
- for companies who want to publicise their latest news;
- for associations to share and exchange information about their actions and activities.
Furthermore, regular, authentic and original content, coupled with a well used and configured blog, will optimise your website's ranking in search engine results like Google. Indeed, by following good SEO practices, the search engine algorithm will judge your work as qualitative and will give it more prominence than other content on the internet.
Steps to create a blog with WordPress
Step 1: Choosing accommodation
Before you rush into writing your posts, the first step in creating your blog with WordPress is to choose your web hosting.
Please note that the notion of web hosting should not be confused with services and platforms such as WordPress.com. For more information, we invite you to read our presentation of the service and comparison with the official version of WordPress on our blog.
Here, we will always use the real version of WordPress (in .org). A free, open source CMS, WordPress allows you to create all types of websites, including blogs, suitable for any activity or business.
For more details of the websites that can be designed with WordPress, we recommend you read our dedicated article.
Now that we've cleared up a few points that can be confusing for beginners, to set up your blog you will first need web hosting.
Web hosting is a digital storage space that you rent to store your website data. Thus, any Internet user will have access to your website through a web browser, regardless of the time of day or their location in the world.
In 2022, there are many companies offering their web hosting solutions.
In France, we can cite the web hosts OVH, 1&1 or PlanetHoster as key players ensuring a quality service.
Compare their "web hosting" offers according to your needs and expectations. Without a doubt, you will find the right package for you.
Step 2: the domain name
The domain name is the URL of your blog, the equivalent of a postal address, but digital. In other words, it is a string of characters followed by an extension (mostly .fr or .com) that a web user will enter in the URL address bar of their browser to access your blog.
A free domain name is usually included in the web hosting offer you choose after checking its availability. If the domain name is already in use by another website or is owned by an Internet user, you will not be able to acquire its use. Note that you can buy a domain name separately from a web hosting package, which means that the two are not linked.
Take time to think about your domain name and its extension. If you do not have a defined name for your project, choose a short and easily memorable name. If your identity is well established, avoid using too many hyphens and unnecessary words that will make your domain name heavy and unreadable.
There are two types of extension: national extensions (.fr, .be, .uk, etc.) and generic extensions (.com, .org, .net, etc.).
In order to choose, it is necessary to look at the activity and the scope of the activity.
Are you an association? Go to .org. Do you want to reach international readers? The .com extension will be the most suitable. If, on the other hand, your cooking blog is intended to share your recipes with your friends, choose .fr.
You should know that it is possible to acquire several domain names with different extensions if they are available for purchase.
Step 3: Installing WordPress on your web hosting
Once you have set up your domain name and acquired web hosting, the next step is to install WordPress.
More and more web hosts offer a self-installation service directly integrated into the control panel of your customer area. If you have chosen OVH, the company has put a video tutorial online to help you install your blog step by step with the modules in 1 click:
If you choose a different host, please refer to the documentation provided.
Once the configuration of your blog is started, you will have to fill in some essential information such as :
- a username for the administration account and/or an email address;
- a password ;
- an address / URL for the installation of your site (we advise you to leave the field blank for a default installation at the root of your hosting);
- the domain of your website;
- its language ;
- the title of your blog;
- a possible subtitle.
Did you fill in these fields? Congratulations! Your WordPress blog is officially created! You can now log in to the WordPress administration interface to start configuring and customising your blog. To do this, enter the following URL mydomainname.com/wp-admin into your web browser and log in with your account name/email and password.
Step 4: Find the right WordPress theme for you
Once you are in front of the WordPress admin panel, the first step is to find the perfect WordPress theme to customize your blog.
To help you in your choice and present you with different theme libraries, we invite you to consult our dedicated article "How to choose your WordPress theme?
To install a theme, go to your WordPress administration area, tab "Appearance" then "Themes".
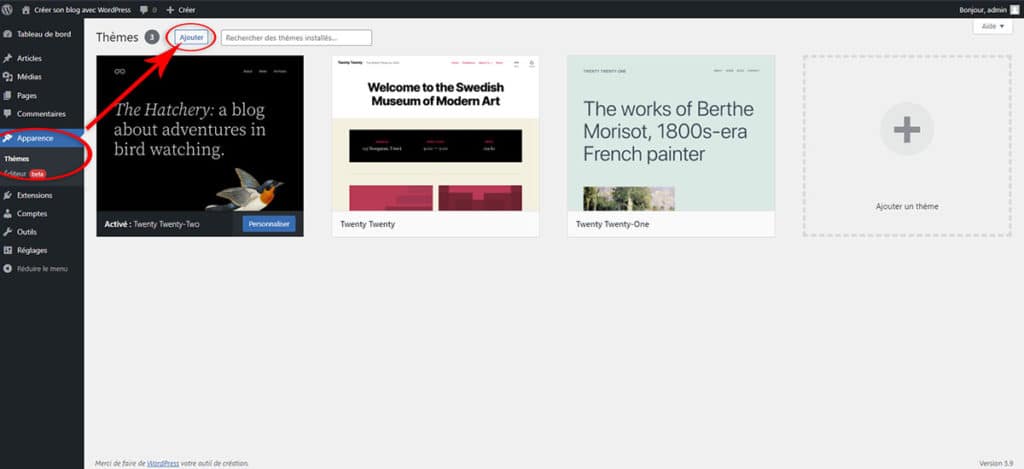
By default, WordPress offers three themes, one of which is enabled.
Not happy with these themes? Click on the "Add" button at the top of the window to access a gallery of free and paid themes referenced by WordPress.
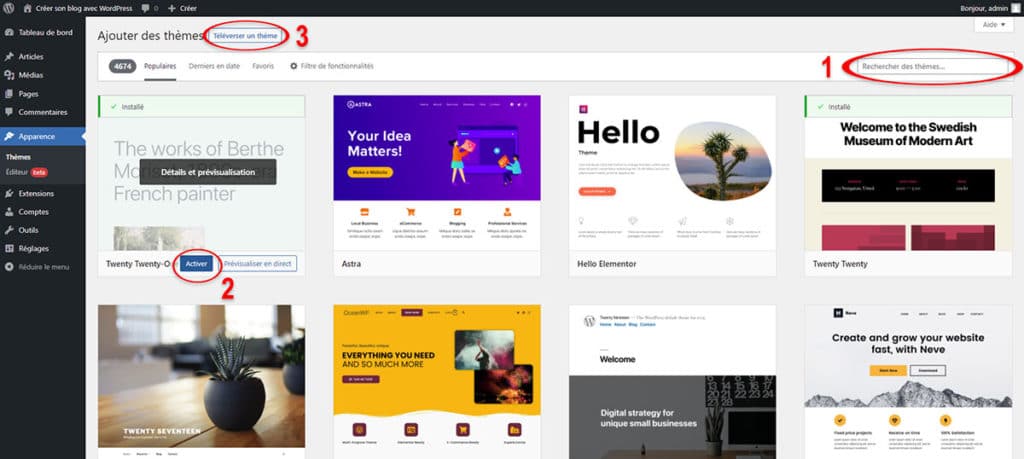
To choose, install and activate a theme, the gallery interface is composed as follows
- Thanks to an integrated search bar, you can search for THE perfect WordPress theme from a wide range of choices.
- Once you have chosen a theme, install it and activate it with "Install" then "Activate". Before installing a theme, you can see how it will look on your blog with the "Live preview" button.
- If your theme is not available in the gallery or you already have its files, you can "Upload a theme" by adding its .zip folder to your site directly on the management interface.
Finding the right theme for your WordPress blog requires some thought. Take the time and test out different themes with the live preview option, because one thing to keep in mind is that your entire blog will be based on the chosen theme. If you change your theme, you will have to reconfigure many of the customisation elements.
Step 5: Configure your WordPress theme
Have you found the perfect WordPress theme for your blog?
The next step is to configure it with theWordPress customization interface. This is where you will enable and disable modules in your theme, change the colours and fonts for your text and titles, etc. In addition, the interface allows you to preview your changes before they are saved and uploaded to your website.
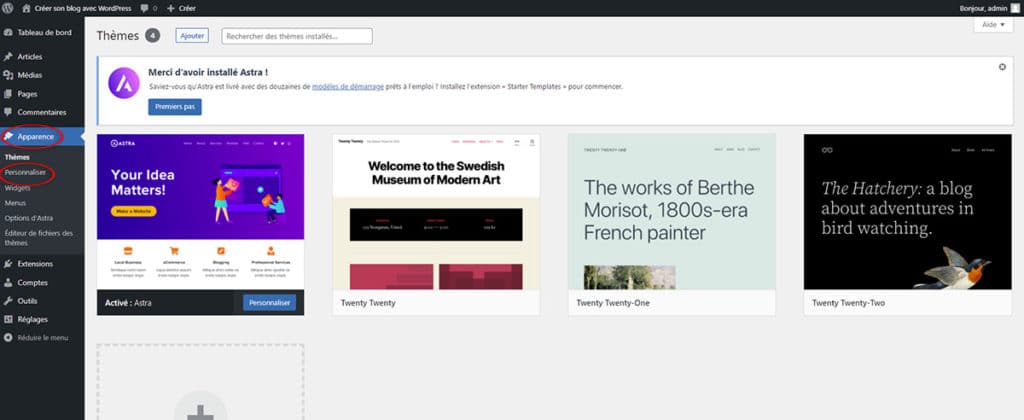
To access the theme customisation interface, go to your WordPress admin panel, click on "Appearance" and then "Customise".
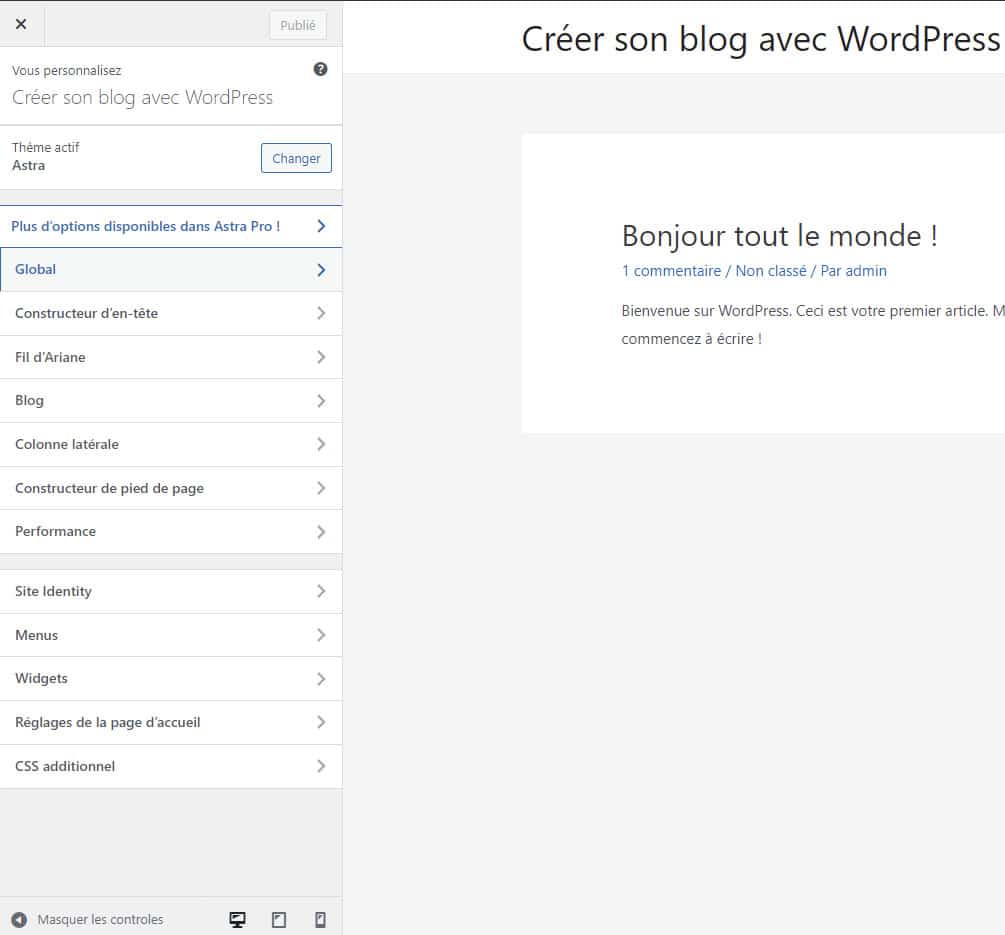
Once in the customisation panel, you have access to several categories of elements to modify as you wish.
To illustrate, the "Header Builder" option with the Astra theme allows you to add a title to your site as well as a logo, with the possibility to choose a slogan (subtitle) and to configure a main menu.

Please note that the categories in the customisation panel vary depending on the theme used. If you have chosen a freemium theme, several options will be inaccessible. To unlock them, you will need to purchase the paid version.
Step 6: Writing your first articles
Now that you've gone through all the customisable elements of your theme and have set up your blog properly, it's time to write your first posts.
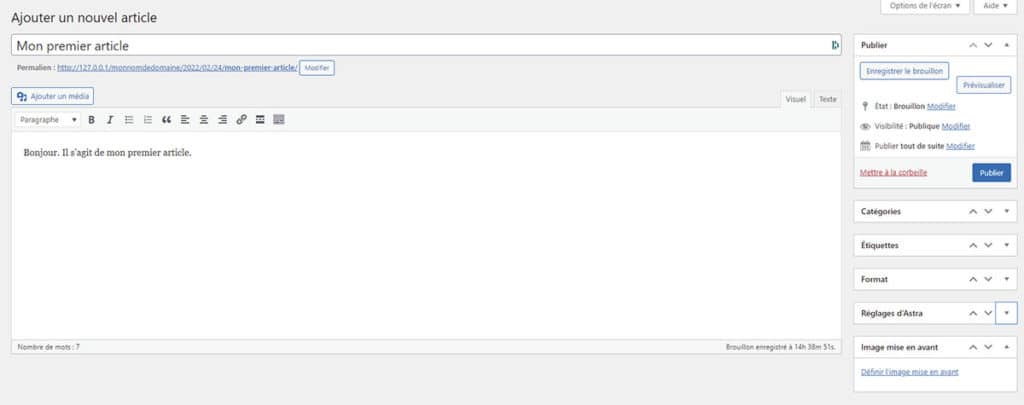
To do this, go to the left side menu of your WordPress admin panel, category "Posts" and click on "Add".
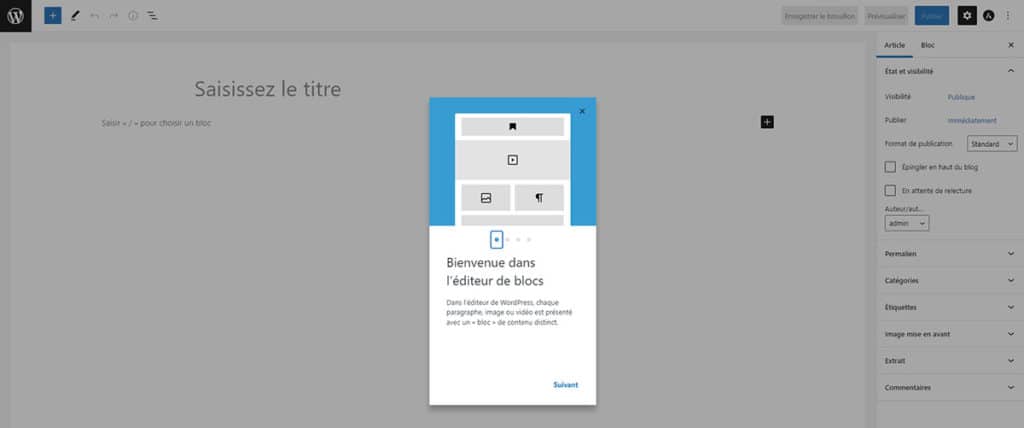
As soon as you arrive in the authoring interface, a tutorial appears to introduce you to the WordPress block editor. Launched in December 2018, the Gutenberg editor takes a new approach to content creation. With Gutenberg, each element of your post is a "block" to be assembled with the others: paragraph, image or even video.
In addition, users with advanced knowledge will be able to take advantage of this technology to create their own custom blocks.
If the block editor doesn't work for you and you want to go back to a more classic interface, "Classic Editor"The official plugin maintained by the WordPress team will allow this.
In both cases, you have all the elements you need to write the first articles of your blog. All you have to do is write your text, insert some images and videos, and click on the "Publish" button to make your content public.
INGENIUS tip: consider assigning your articles a category andtagsto classify and link them together. These two options allow you to suggest similar content to your readers when they read an article and help them find their way around the topics. This is a perfect way to retain readers and boost views on your different content.
Step 7: Choose your plugins
Your blog is set up and now contains several carefully written articles. Your first readers are starting to interact with your content and you think that some additional features to make your blog attractive would be nice.
Good.
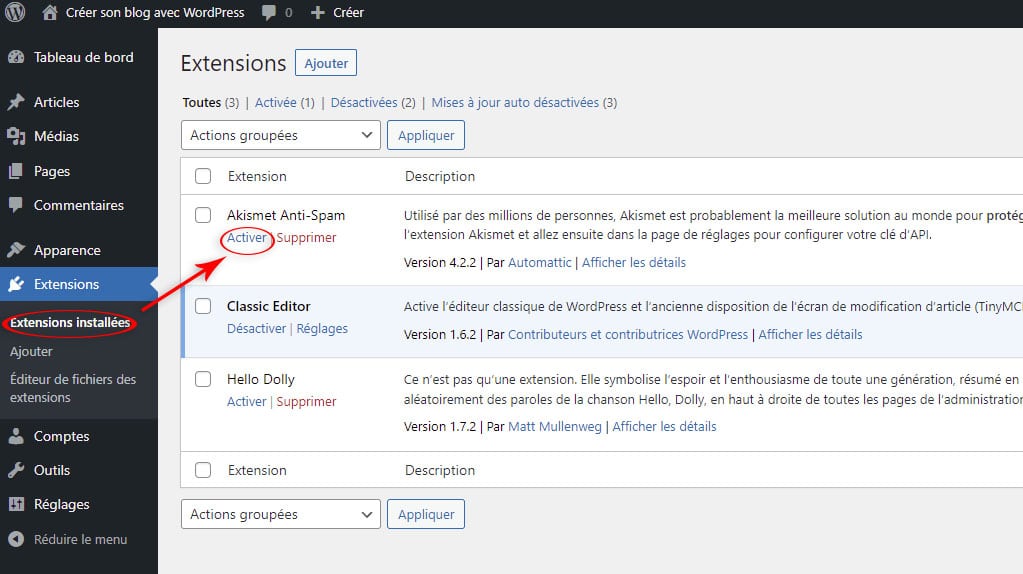
But first, it's important to consider preserving the integrity and security of your blog by protecting it from spam and other unwanted content. If you don't do this, your blog will be exposed to an outbreak of comments from bots with dubious links.
By default, the extension Akismet Anti-Spam is installed on your WordPress site, and its activation is done in the "Extensions" interface. There are of course other more complete and complex solutions, but for starters, Akismet will deliver on its promises.
Depending on your needs and expectations, there are many features that can be useful for your blog. Some of the most popular are :
- the addition of new options to the comment area;
- the addition of buttons for sharing on social networks;
- the creation of a contact form to allow your visitors to contact you;
- the implementation of SEO tools and referencing;
- ... and much more.
To see what solutions exist and which plugins are sure to simplify the day-to-day management of your blog, please refer to our "WordPress Plugin Checklist to get started".
What to do next with your blog?
Now that you've set up and configured your blog properly, your posts are attracting a decent number of readers and the latest cutting-edge management plugins are enabled: what to do ?
Depending on your ambition and the amount of time you plan to devote to your blog on a daily basis, there are several objectives:
- make money by monetising your content;
- attract more readers to your blog;
- or both.
The actions to be taken to achieve them are multiple, and deserve an article dedicated to them.
In any case, there is no miracle formula. However, the key to success will inevitably involve long hours of work creating regular content and optimising it with an SEO strategy.
To save you hours of learning and lighten your To-do list, INGENIUS has specially designed Genius SEO, an automatic SEO service dedicated to WordPress. In just 8 months, Genius SEO will work on 3 fundamental pillars of SEO, namely technique, content and reputation, to bring you more traffic and propel your blog into the monetization era.
Interested? Book a call today on our dedicated page to get a demonstration of the service and its possible results.
Now you have a good, solid foundation for blogging with WordPress! Now all you have to do is.
But tell me... Why do you create a blog? To talk about a passion or a product? Share your projects in the comments and use the comments to ask your questions!