
Google Analytics (GA) is a high-performance tool for website owners. Its purpose is to analyse the actions of visitors. The tool has more than one trick up its sleeve. It monitors and tracks the movements of your audience. It improves your customer acquisition strategy. It helps you develop your conversion techniques. In addition, the analytical tool optimises the user experience. Its use seems to be essential to a behavioural analysis approach. How to install Google Analytics on WordPress: a step-by-step guide to the secrets of integrating it into your site.
Step 1: Create a Google Analytics account
Creating a Google Analytics account starts the installation procedures.
Visit the official Google Analytics website
Google Analytics is a tracking tool. It started out as a JavaScript code embedded in some pages, but has now grown into a full-fledged computer program.
Its main role is to measure your online traffic. From this analysis your turnover will be evaluated. Its main advantage lies in its accessibility. Its use does not require any subscription or purchase.
The first step to installing it is not complex, as it is summarised on the official Google Analytics website. You can also login to your Gmail account to open the Analytics tool.
Enter an account name and choose the type of content
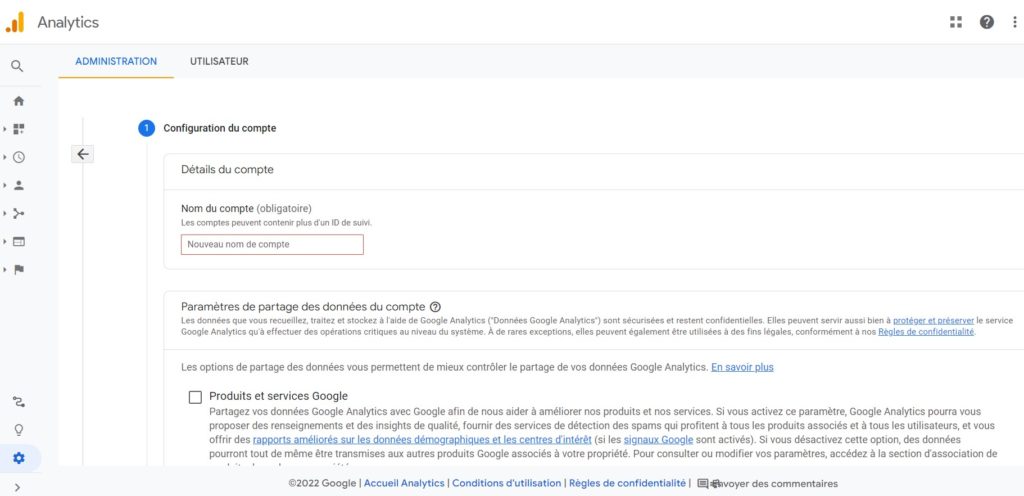
The second step invites you to name your account as: "My websites" or "My sites" for short. You can also use your company's name as inspiration.
Then set up your privacy. Google Analytics has a strict privacy policy and reserves the right to disclose your statistics, your name and your site to third parties. For benchmarking purposes, it does allow anonymous data sharing with other sites in your niche. For marketing purposes, it also allows the distribution of statistical data to your sales team.
Once the name and settings are set, check the boxes: "Google products and services" and "Benchmarking".
Then comes the choice of the type of content to be analysed: digital application, website, mobile application... Here, you will opt for the default choice, i.e. "web".
Fill in the website property
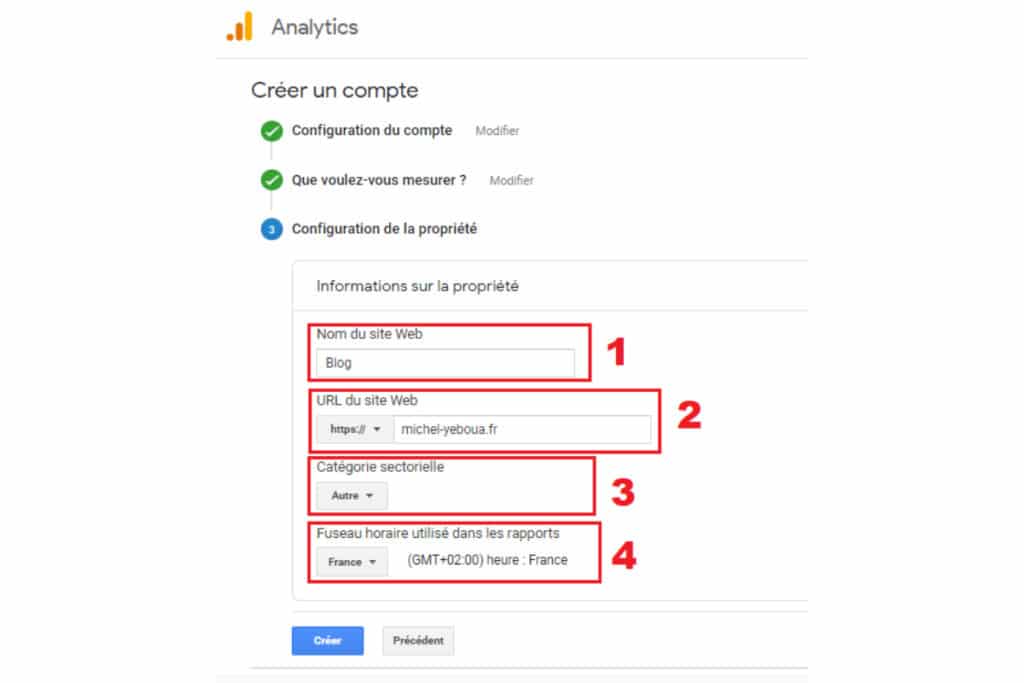
Fill in the information about your website. Fill in the fields consisting of :
- account name (enter any name you like) ;
- website name: the previously defined name ;
- the URL of your website;
- the sectoral category corresponding to the sector of your online activity;
- your time zone.
Setting the time zone requires special attention. An error may distort the time stamp of your information and compromise your overall analysis.
The process ends with the mandatory data protection statements. You are free to read them in full before ticking or to tick directly at the bottom of the page.
Validate your Google Analytics account
Click on the "Create" button to validate your new Google Analytics account.
Google then delivers a piece of JavaScript code to you. This is your Google Analytics tracking code. It will be useful when you integrate GA with WordPress. So remember to put it aside.
Your code looks like this:
<!-- Global site tag (gtag.js) - Google Analytics --> <script async src="https://www.googletagmanager.com/gtag/js?id=Votre ID de suivi"></script> <script> window.dataLayer = window.dataLayer || []; function gtag(){dataLayer.push(arguments);} gtag('js', new Date()); gtag('config', 'Votre ID de suivi'); </script> This concludes the first part of the installation.
Step 2: Incorporate Google Analytics into your WordPress site
There are several ways to integrate Google Analytics with your WordPress site.
Method 1: Use a plug-in
The first tip is childishly simple and involves the use of a plug-in, namely : Sit Kit by Google, MonsterInsights or GA Google Analytics.
Using the Site Kit by Google plugin
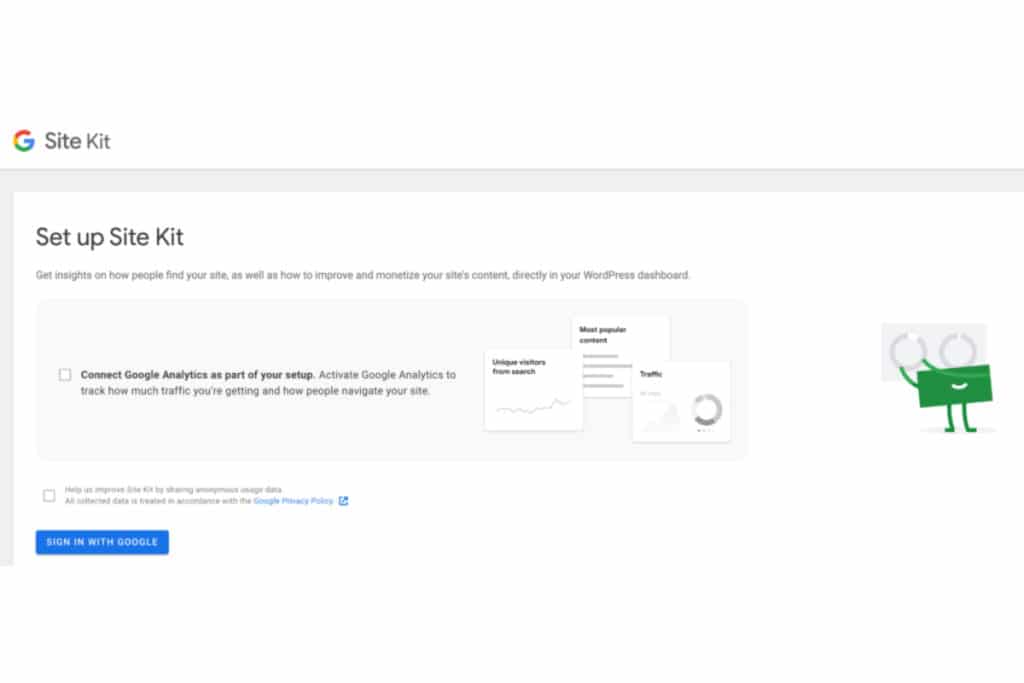
Google Site Kit is the official Google extension. In addition to its ease of use, the tool is able to combine other computer programs with your site, such as :
- Google Search Console (to inspect your website's SEO) ;
- PageSpeed Insights (to highlight the performance of your site) ;
- Google AdSense (to analyse the advertising performance of your site on Google).
Its use requires its prior installation on your site. The appearance of an insert confirms its activation.
Go to "Site Kit", then "Dashboard". The dashboard in your back office confirms the success of the operation.
Using the MonsterInsights plug-in

MonsterInsights ranks as the best Google Analytics installation plug-in for WordPress. The computer program has a freemium version and a pro version (for an annual subscription fee of about 190 euros).
The installation process consists of 4 steps:
- the choice of the type of website: showcase site, e-commerce site or blog;
- logging into MonsterInsights through your Google Account;
- account definition (your Google Analytics account);
- the finalisation of the installation.
The configuration follows the installation and activation of the plug-in. Go to the "Reports" tab which will reveal your dashboard and make the necessary settings.
Using the Google Analytics GA plug-in
Because of its simplicity, the Google Analytics GA extension is the best option. Its installation requires theaddition of a property in Google Analytics. This will centralise the data from your site.
Next, retrieve theGoogle Analytics metric ID attached to the newly created property. It is composed of the prefix "G-" accompanied by 10 characters consisting of a sequence of numbers and letters. The metric ID is located in the "Administration" section, then "Data feeds" and finally "Property". A simpler trick is to search for "tracking ID" in the search bar at the top of your screen.
Copy the code. Go to "Settings", then "Google Analytics" and "Plugin Setting" and paste the code into the control panel.
Method 2: Use a tracking code
The second method is more complex and manually adds a line of code to WordPress to merge it with Google Analytics.
Retrieving the tracking code
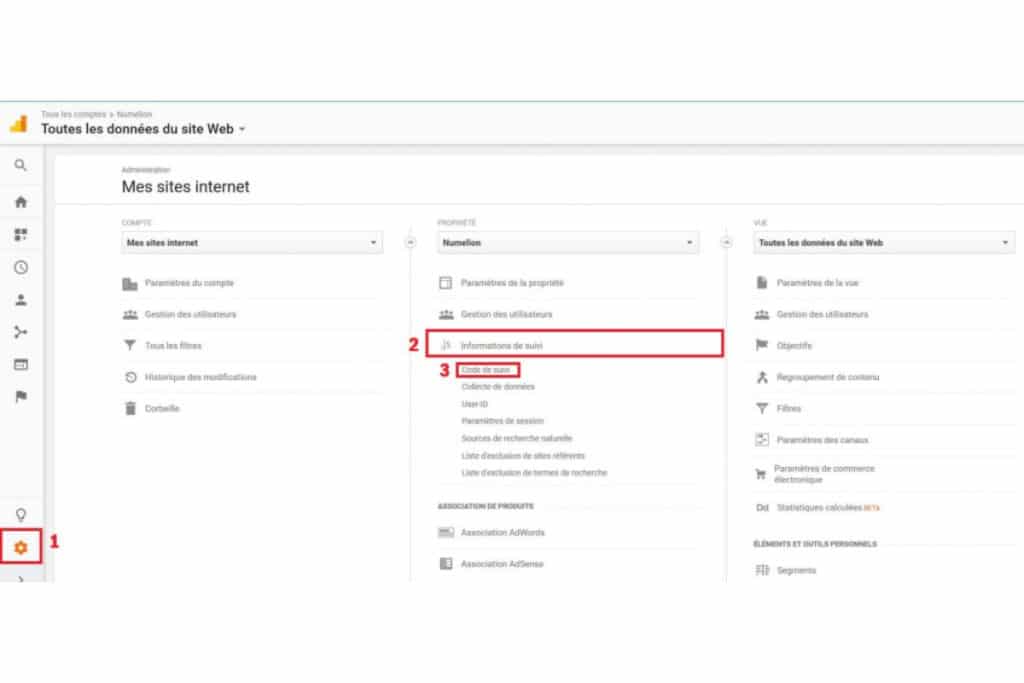
Also known as a tracking tag, the tracking code set aside provides the link between your WordPress site and Google Analytics. If the tracking code goes astray :
- log in to your Google Analytics dashboard;
- choose the "Administration" tab;
- go to the "Configuration Wizard" tab;
- then select the "Install the tag" tab;
- click on "Web" and then on your property;
- choose "Global site tag".
Your tracking code is similar to the GA measure ID. It takes the form of "G-XXXXXXXXXX".
Add tracking code
Le code prend place dans la balise <head> du site web. Son incorporation vous conduit à une alternative entre l’ajout dans le thème enfant de votre site ou au moyen d’un plug-in WordPress. La première option s’applique au site web disposant d’un thème enfant actif. Pour rappel, il s’agit d’un template dépendant d’un autre template WordPress (le thème parent). L’ajout s’opère en 5 temps :
- copy your code ;
- go to your dashboard;
- go to the 'Appearance' menu, then 'Theme Editor';
- modify the "Functions.php" file;
- paste your tracking code into the .php tags;
- save the changes.
La seconde méthode s’applique à tous les plug-ins WordPress. Rendez-vous dans l’onglet « Réglages » du tableau de bord. Placez le code de suivi dans l’en-tête <head> et enregistrez.
Method 3: Use Google Tag Manager
Google Tag Manager centralises and manages the tags (Pinterest, Criteo, LinkedIn...) of WordPress sites. Its presence facilitates the administration of tags and saves you the tedious modifications of the code of your site. It avoids coding errors.
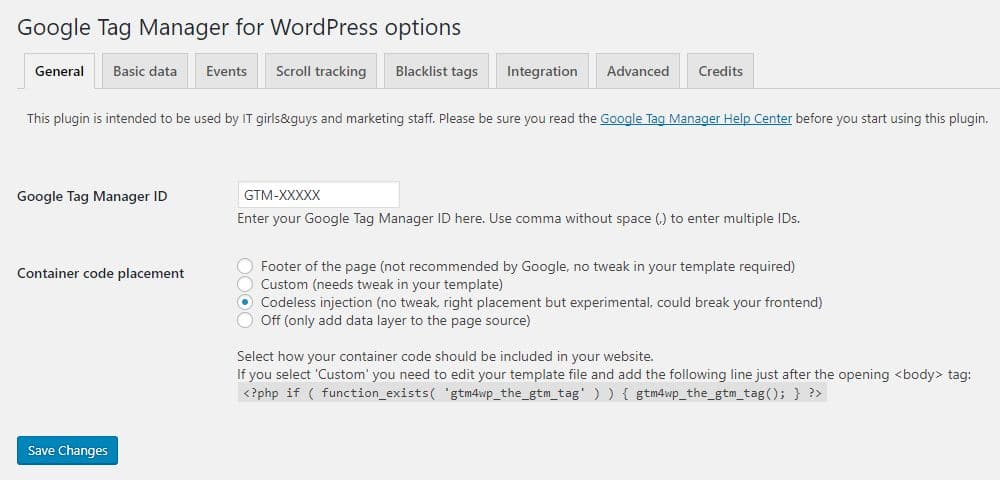
Its use requires the installation of the Google Tag Manager for WordPress extension, then the creation of a Google Tag Manager account. The procedures are similar to the creation of a Google Analytics account, except for the creation of properties. This time, create a "container" and not a property.
Retrieve thecontainer ID from the "Admin" tab. It contains the prefix "GTM-" followed by a series of numbers and letters.
Copy and paste the ID into the WordPress extension's control panel under "Settings", then "Google Tag Manager" and "General".
Method 4: Synchronise Google Analytics to the server
The final installation method takes place on your server. Google Analytics has a default cache time (an intermediate memory) of 2 hours. If its data changes, users will access the latest updates instantly. However, changing the cache time on the server slows down the updates. For this reason, Google does not recommend this method.
However, it has some advantages. It reduces external HTTP requests and uses server caching. In other words, it optimises the performance of your site.
Before the procedures, deactivate the analysis extensions to avoid their possible malfunctioning.
Synchronising Google Analytics to the server is simply a matter ofadding the GA tracking code to your server. It requires the use of a plug-in called CAOS | Host Google Analytics Locally.
Go to "Settings", then "Optimize Google Analytics" and finally "Basic Settings". Copy and paste the Google Anatycis tracking ID into the "Google Analytics Tracking ID" field.
Also read: WordPress Interface Guide
Getting to grips with Google Analytics
After the installation comes the use of Google Analytics, but you still have to get used to the tool.
Check the functionality of Google Analytics
The verification takes place on the Google Chrome browser and requires the installation of an extension called Tag Assistant on your browser. The installation procedures are located in the "Add to Chrome" option. Then follow the installation instructions.
Then go to your website from Chrome. You will see a new little icon in the browser bar in the shape of an upside-down smiley face of Tag Assistant. Click on it and choose "Enable". Refresh your page and click the smiley icon a second time. The appearance of an element in green confirms the functionality of Google Analytics. The appearance of ared element is a sign of a flaw in the procedures. In this case, start the GA installation again.
Another method of confirmation is based on a simulated analysis of your site. To do this :
- go to your Google Analytics account;
- click on the house icon which will take you to your dashboard;
- select the "Real Time" tab;
- using another browser or your mobile phone, visit your site and browse a few pages for a minute.
The appearance of at least one visit in the "GA Real Time" tab certifies the functionality of GA.
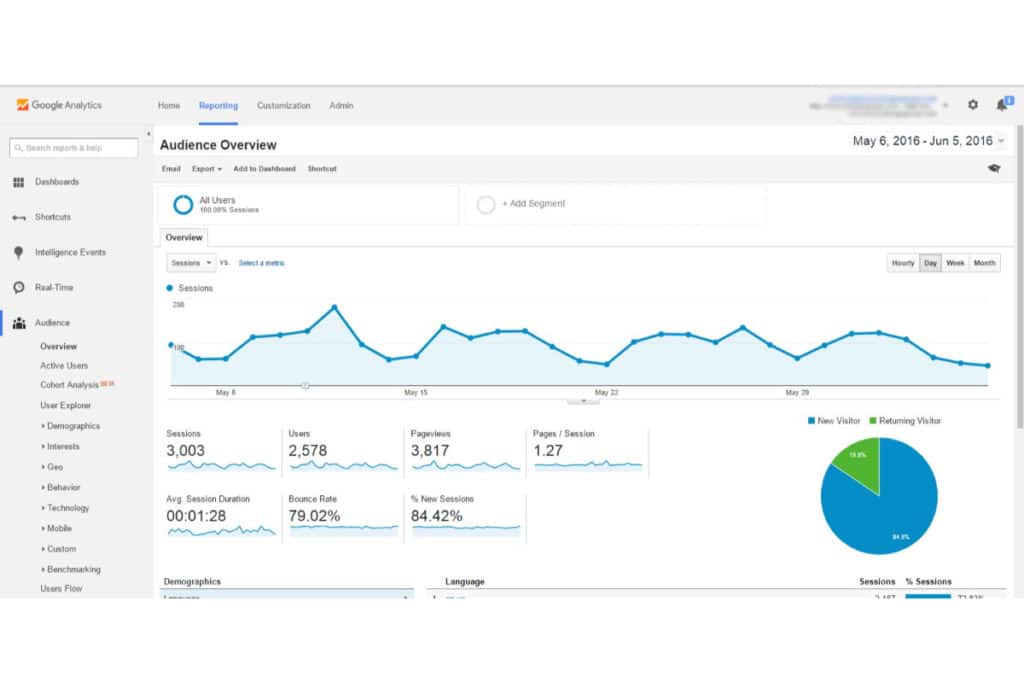
Understanding the Google Analytics homepage
Logging into Google Analytics takes you to its home page. It displays a list of the sites attached to your GA account. The inventory reveals some basic data: the number of sessions, the bounce rate and the conversion rate.
The "Compare to" box compares the data associated with different time periods. The comparison shows the fluctuation of the visit rate of your site.
The "Reports" tab reports information associated with a specific site in your list of websites.
What information does Google Analytics collect?
Google Analytics first collects "Real Time", i.e. the different actions carried out on the site at a given moment. It analyses the "Life Cycle" of your site, in other words :
- acquisition (visitor origins) ;
- engagement (visitor behaviour);
- monetisation (the rate of sale) ;
- loyalty (the return of former visitors).
It collects demographic data (location, age, gender...) and technological data (type of device used, browser...) from users.
In addition to user data, the tool also collects :
- the number of visitors in the last half hour;
- the rate of users browsing on mobile and PC ;
- most visited pages ;
- the average time spent on each page;
- the origin of the visitors ;
- the bounce rate.
This data includes the behaviour of each visitor.
What data to focus on?
Focus your attention on 5 indicators: your traffic, traffic sources, terminals used, audience, popular pages. Thetraffic analysis is done in the "Audience" tab, then "Overview". You will see a graph showing the number of visits over a defined period.
The traffic sources study the origin of the visitors. The observation takes place in the tab "Acquisition", then "Overview". A diagram shows you the channels and their percentage:
- Social: users from social networks;
- Direct: visitors who have entered your address in their browser;
- Organic Search: visitors from search engines;
- Referral: users redirected to your site from an external link.
Theinspection of the terminals takes place in the tab "Audience", then "Mobile", and finally "Overview".
The number of audiences is estimated in the "Audience" section, then "Geographical data".
The most popular pages can be consulted in the "Behaviour" menu, then "Site content" and finally "All pages". A table summarises the attractive subjects, articles and pages.
The use of Google Analytics and the RGPD
As a reminder, the GDPR (General Data Protection Regulation) requires users' consent before any attempt is made to retrieve their data for exploitation. According to the jurisprudence of the Court of Justice of the European Union, GA cannot be used without the consent of visitors. Therefore, it is important to inform them of this through your Privacy Policy page or in your cookie policy.
Another tip suggests an approach toanonymising the IP address of visitors.
Installing Google Analytics on Wordpress: summary
This step-by-step guide shows you the simple tricks for combining the two tools.
Creating a Google Analytics account is the first step. Enter an account name and a content type. Fill in the site property and validate your account.
There are four methods of installation: using a plug-in (Site Kit by Google, MonsterInsights or GA Google Analytics), using the tracking code, using Google Tag Manager or synchronising Google Analytics to your server. After installation, check its functionality using the Chrome browser and the Tag Assistant extension.
It should be noted that the use of the tool goes against the RGPD, hence the need for visitors' consent.
What do you think of the installation procedures? Are you ready to use the Google Analytics tool? Tell us your answer in the comments.