When you first start using WordPress, one of the first things you’ll need to do is familiarize yourself with the technical terminology. You’ll come across new terms like shortcodes, taxonomies, headers, custom post types, and footers. Although located at the very bottom of the site, the footer deserves a great deal of attention. It’s actually a strategic section that you should give serious consideration to, even if you aren’t used to doing so. What should you know about the WordPress footer, and how can you customize it?
Everything You Need to Know About What a Footer Is
Also known as a footer, this section appears at the bottom of a website. It is the same on every page. It contains information designed to help visitors better understand a brand and navigate the site.
The footer is one of the four essential elements that form the framework of a page or post on WordPress. Along with it, you have the header, the body, and the sidebar.
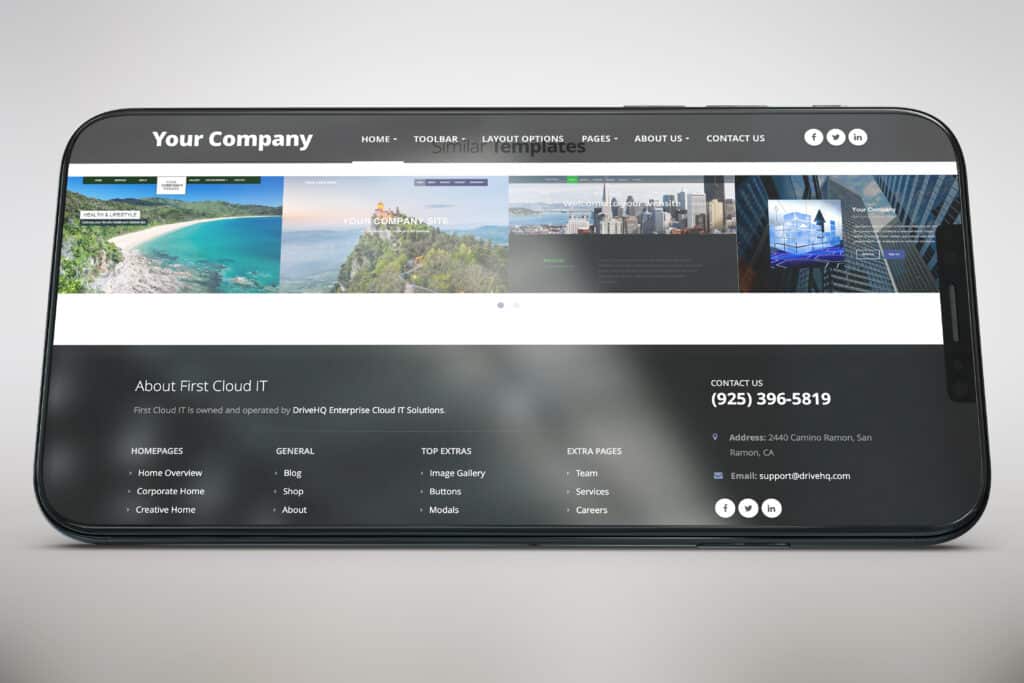
When it comes to the layout, size, or design of your footer, there are no set rules. As a result, you may come across fairly minimalist footers, but also large , elaborate ones with numerous columns and links—especially on e-commerce sites.
It’s also worth noting that some websites give the impression of not having a footer. Using the “infinite scroll” technique, they allow users to scroll through the page’s content continuously. They obviously do have a footer, but in this case, you simply keep scrolling down the page. However, this type of website remains relatively rare on the internet.
How important is the footer?
It may not seem like it, but the footer is of great strategic importance. In fact, it offers many advantages. For example, it simplifies navigation and helps visitors find their way around, especially through the inclusion of links or a site map.
The footer can also help build trust by providing required legal information. It can also help enhance a brand’s credibility and expertise. To that end, you can, for example, display certifications or badges. The footer can also improve your conversion rates by encouraging users to take action. To be both practical and effective, your footer should include several essential elements.
The Different Elements That Make Up an Effective WordPress Site Footer
The footer is unique and distinctive, reflecting the website to which it belongs. You’ll notice that from one site to another, there can be striking differences in structure, design, and content. However, there are several essential elements. That’s why you’ll rarely find them on the sites you visit frequently.
Legal Notices and Their Purpose
Legal notices are required for every website, and they are also mandatory for personal blogs. They consist of all the information intended for website visitors regarding the website and its owner. The purpose of legal notices is therefore to protect both readers and the webmaster.
Role and Importance of the Privacy Policy
Right after the legal notices, you need a page dedicated to your privacy policy. This has become even more essential since 2018, the year the GDPR took effect. Among other things, this page must clearly explain how you handle the data of your various visitors.
You can create it very easily because WordPress provides a template available in your admin dashboard menu. All you have to do is select it and edit the suggested paragraphs. Then, you’ll need to insert them into your footer.
General Terms and Conditions of Sale and General Terms and Conditions of Use
When you sell products or services online, you must include your Terms and Conditions of Sale (TCS) on your website, typically in the footer. As for the Terms and Conditions of Use (TCU), their inclusion is optional. The Terms and Conditions of Use outline and govern the rules for accessing and navigating your website.
They also define what is permitted and what is prohibited for both users and publishers with regard to the management of the website. Seek the services of a legal specialist. This professional can provide you with the appropriate support regarding the Terms and Conditions of Sale or the Terms of Use and their drafting.
The Role of the Site Map
A sitemap is a file that lists all the URLs on your website. There are two different types. First, the XML sitemap is intended primarily for search engines.
The HTML sitemap, on the other hand, provides a detailed overview of the content available on your site. The HTML sitemap can usually be found in the footer of most websites. To create one, you can use the WordPress Sitemap Page plugin.
Copyright and Its Importance
Identified by the © symbol, copyright notices appear in many website footers. However, according to Wikipedia, they have no legal standing in France. You will find them in common-law countries such as the United States and the United Kingdom, among others. In France, on the other hand, copyright protection applies solely by virtue of the creation of the work.
There is therefore no need to display the symbol. Designed to provide information, the work offers a benefit to your readers, who automatically know who owns the site.
What is the purpose of contact information?
Another feature that’s really useful is including contact information. While it’s certainly not required, you should give this serious consideration—especially if you run a service-based business. You could add this information by including a link to your Contact page. You can also do this by using a contact form.
You can also do this using a call-to-action button that includes your phone number or links to a specific page. It’s also possible to do this through text-based content, such as an email or a phone number.
A few other elements to include
In addition to these essential elements, it’s also important to include other features in your footer. However, you should keep it simple and consistent. For example, you could include icons inviting visitors to follow your content on social media. You might also consider featuring your Instagram, Facebook, or Twitter feed.
Includinga Google Maps widget can also be important so that your visitors can locate your business. This is a very convenient option if you have a physical store. You’ll also need to include your logo, recent blog posts, and a sign-up form so that visitors can subscribe to your newsletter if they’d like.
If you have a members-only area, it would be helpful to include a link or button for users to log in to your site. You’ll also need a background image or video, as well as certifications to demonstrate your high level of expertise in one or more fields. To reinforce social proof, testimonials from people who are satisfied with your products or services can also be valuable. A call-to-action button can also be very important.
The Process of Creating and Customizing a WordPress Footer
First, you can create a footer in WordPress using the Customizer. The Customizer is accessible from the Appearance menu, then Customize. This allows you to make basic adjustments to your theme right away without touching a single line of code.
As such, it’s a very handy tool for beginners. However, not all themes use the Customizer. This is the case with the native Twenty Twenty theme. It doesn’t offer any options for customizing the footer. In this case, you’ll need to edit the code yourself, since it’s impossible to change the copyright notice in your WordPress footer using the Customizer.
However, most WordPress themes include settings that let you customize your footer. You can customize the text, colors, layout, and even the copyright notice. The options may be limited, however, depending on what your theme’s developer has included.
Options depending on the developer
Once again, the range of options depends on what your theme’s developer has included. The free version of GeneratePress offers, among other things, settings for the footer width, the ability to choose how many widgets to display, and the option to enable a “Back to Top” arrow.

Compared to the free version of the OceanWP theme, this version lets you choose whether to display the footer based on the device your visitor is using. It also allows you to edit the copyright notice, adjust the inner margins, and choose colors for the background, links, text, and hover effects.
If you can’t find your footer settings in different places within your Customizer, that’s not surprising. In fact, the theme you’ve chosen determines where each setting is located. With GeneratePress, you’ll find them in a menu called “Footer,” while OceanWP groups them under the “Bottom of Footer” menu.
Using Widget Areas to Customize Your Footer in WordPress
Thanks to the widgets, you can also customize your footer. A widget is an insert or block of content that you can place in a widget area, such as the sidebar or footer. The number of widgets and widget areas available depends on the theme you’re using. No matter which theme you use, you have access by default to at least 17 native widgets provided by WordPress. To see what your theme has to offer, go to the Appearance menu and then Widgets.
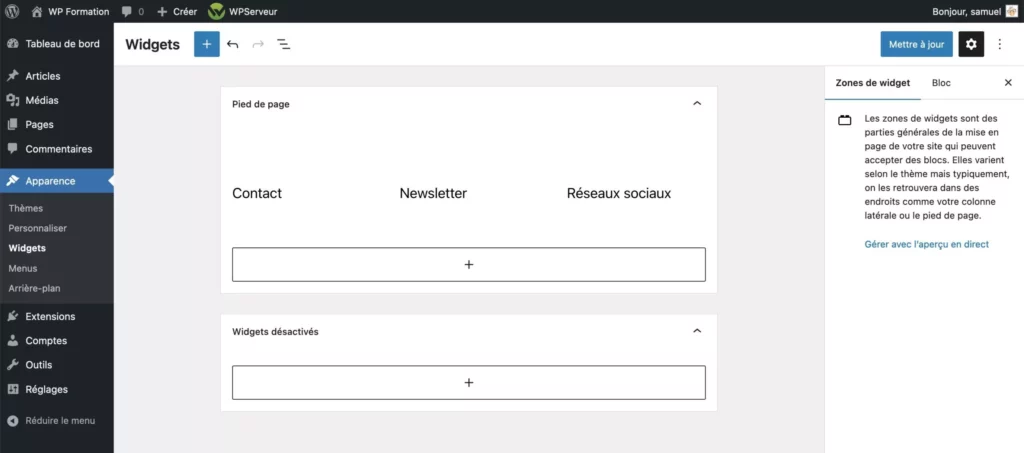
With the Twenty Twenty default theme, for example, you have access to two widget areas: Footer #1 and Footer #2. You can add any widget of your choice from the left-hand side using a simple drag-and-drop. By clicking the arrow in the upper-right corner, you can edit each widget.
The Text widget can be a valuable tool for adding your contact information. If you’d rather add buttons to let your readers follow you on social media, you can use the Simple Social Icons widget, which is provided by the plugin of the same name. If you’d prefer to include your latest posts in your footer, the Recent Posts widget is there to help.
What can you do without a customization tool and interesting widgets?
It’s possible that your theme doesn’t use the Customizer and doesn’t offer any widgets that interest you. In that case, keep in mind that some themes use a dedicated settings page that you can access from your WordPress Dashboard.
It's true that it's less convenient in terms of user experience, but you'll be able to make changes without having to edit the code. The Salient premium theme can help you with that.
How the Salient Premium Theme Works
The Salient premium theme, one of the most popular on the ThemeForest platform , offers you a wide range of options. When you use it, you can choose the number of columns in your footer, edit the copyright text, or add a background image. You can also include icons so visitors can follow you on social media.
In addition to the Customizer and the specific settings offered by your theme, your WordPress footer can also be created and modified using a page builder—provided that the page builder allows you to edit this specific area. This is the case with Elementor Pro, Beaver Builder, Divi Builder, and Thrive Architect, among others.
Using an extension to customize the footer
In addition to the Customizer, widgets, and settings offered by your theme, there’s another way to customize your footer. Plugins are the fourth tool you can use. Their purpose is to let you add new features to your site without having to write code.
When it comes to footers, there are countless plugins to choose from in the official WordPress repository. Some plugins have been designed specifically to work with page builders, such as Elementor. To design the perfect footer, Elementor – Header, Footer & Block Templates, as well as Elements Kit Elementor add-ons, will be invaluable resources.

There are also plugins that let you add specific pieces of code, such as tracking codes to link Google Analytics and the Facebook pixel, insert scripts, and more. Examples include the “Insert Headers and Footers,” “Head, Footer, and Post Injections,” and “Header Footer Code Manager” extensions.
It’s worth noting that these plugins also work for the header of your WordPress site. However, they are not intended to customize the visual appearance of your footer or to add content to it. It’s also worth noting that there are plugins designed to modify the copyright notice in your WordPress footer. For example, you could use “Remove Footer Credit” for this purpose, which is very easy to use.
Use the code to customize your footer
It's true that this can be difficult, especially for a beginner, but editing the code is one way to create and customize your footer. However, there are two important precautions you'll need to take.
You must use a child theme—in other words, a sub-theme that inherits all the features and styling of the parent theme. A child theme ensures that you won’t lose any changes you make during future updates to the parent theme.
Next, you need to back up your website—that is, your files and database—before you begin. After all, a syntax error or bug can always occur. Taking these precautions in advance ensures you don’t take any risks.
The changes you need to make can be made in two different files. The first is style.css, which contains all the code related to the visual appearance of your footer. It allows you to adjust the size of your footer or change the color of your WordPress site. You can also do many other things, such as adjusting spacing and changing the font and font size.
The second file is called footer.php. This file contains PHP code. By editing it, you can, among other things, modify the HTML code used to display the footer, or add or remove elements from it. Footer.php contains code snippets that allow you to customize both the structure and the layout of your footer.
WordPress Footer: At a Glance
Although it’s located at the bottom of the page, it’s essential to optimize the footer to make things easier for your visitors. This helps create a more enjoyable user experience and encourages them to take one or more specific actions. You now know everything about the importance of the footer and the different ways to create or customize it.