Web security is more important than ever these days. Not only are hackers becoming more sophisticated, but data breaches are becoming increasingly common. As a result, webmasters must —in addition to complying with the GDPR—take steps to protect their users’ data . One of the best ways to do this is to use the “HTTPS protocol.”This makes it much more difficult for hackers to intercept and steal data.
HTTPS can also help you rank higher in search engine results pages. In fact, as part of its effort to make the Internet safer, Google now gives preference to sites that use the“https”protocol. If you’re not using HTTPS, now is the time to start. It will help you protect your users’ data and improve your search engine rankings at the same time.
If you’re unsure how to proceed, don’t panic! This guide will walk you through simple steps to help you upgrade your WordPress site to HTTPS, which will encrypt all traffic between your WordPress site and your visitors.
What is HTTPS?
HTTPS is a type of security measure that encrypts the data exchanged between a server and its visitors. This means that if your WordPress site uses the HTTPS protocol, all data transmitted between your site and its visitors will be encrypted, making it much more difficult for hackers to intercept and steal sensitive information. HTTPS is an important security measure for any website that transmits sensitive information, such as credit card numbers or personal data. You’ll find more information on how to set this up later in this article.

How does HTTPS work?
To understand how the HTTPS protocol works, it’s necessary to take a look at its close relative, HTTP. In the HTTP protocol, there are two main players: the web browser and the server hosting the website to be displayed. When you enter a website’s address into your browser, the browser sends a request to the server hosting that site. The server then responds with the requested website. This process is repeated every time you click a link or navigate to a new page on a WordPress site.
The HTTPS protocol is an extension of the HTTP protocol that adds an extra layer of security. Unlike HTTP, all data exchanged between the server and the browser is encrypted, making it much more difficult for third parties to intercept and read. This is why HTTPS is often used for sensitive transactions such as online banking and shopping. While the enhanced security of HTTPS comes at a slight cost in terms of performance, the benefits generally outweigh the costs for businesses and individuals who need to protect their data. In recent years, there has been a shift toward using HTTPS for all websites, not just those that handle sensitive data . This shift is driven by growing concerns about online privacy and the increasing sophistication of cybercriminals. By using HTTPS, website owners can help protect their visitors’ data and provide them with peace of mind as they browse their site.
Why Switch WordPress to HTTPS?

In the age of e-commerce, security is more important than ever. If your WordPress site handles sensitive customer data (addresses, credit card numbers, etc.), it’s essential that you take steps to protect that data from hackers. One of the best ways to do this is to switch your website from HTTP to HTTPS. HTTPS is a more secure protocol that encrypts all data transmitted between the browser and the server. This makes it much harder for hackers to intercept and steal customer data. As a result, switching to HTTPS can help protect your customers’ data and ensure its security.
In addition, HTTPS is becoming increasingly important for search engine optimization. Google now gives preference in its search results to WordPress sites that use HTTPS, so switching to HTTPS can also help improve your WordPress site’s ranking. For all these reasons, it’s clear that switching to HTTPS is a smart decision for any WordPress site owner.
Steps to Switch Your WordPress Site to HTTPS
There are a few steps you need to follow to switch your WordPress site from HTTP to HTTPS. First, you need to purchase an SSL certificate and install it on your server. Next, you need to update your WordPress site’s URL from HTTP to HTTPS. Finally, you need to install a plugin that will redirect all HTTP traffic to HTTPS. Let’s take a closer look at each of these steps.
Obtain a valid SSL certificate
Purchase the SSL certificate
The first step in setting up SSL on your website is to purchase an SSL certificate. You can do this through your web host or a trusted certificate authority such as Ovh, Ionos, Gandi, etc. Once you have obtained your certificate, you must install it on your web server. The exact process varies depending on your hosting software, but most servers make installing an SSL certificate relatively easy.
Get a free certificate
When you think of free certificates, Let’s Encrypt immediately comes to mind. If you don’t want to spend money on an SSL certificate, you can get one for free from the nonprofit organization Let’s Encrypt , which is dedicated to making the web safer by providing free SSL/TLS certificates. Their certificates are just as secure as paid ones and are supported by all major browsers.

To obtain a free certificate from Let’s Encrypt, you must use their Certbot tool, which is a command-line tool that makes it easy to obtain and install Let’s Encrypt certificates.
Install the SSL certificate
After generating an SSL certificate, the next step is to install it on your web server so that your site can begin serving HTTPS traffic. The exact process varies depending on your server software, but most servers make installing an SSL certificate relatively easy. They’ll let you upload the certificate and key files and provide a settings page where you can specify the domain name(s) to which the certificate should be associated. Once you’ve completed these steps, your WordPress site should be able to start serving HTTPS traffic. If you encounter any issues along the way, our WordPress support team will be happy to assist you.
Convert HTTP URLs to HTTPS
Once the certificate is installed, you'll need to configure your website to use the SSL protocol. Again, the procedure varies depending on your server software, but it generally involves specifying that all traffic should be redirected to the HTTPS version of your website.
SSL certificates are an important part of ensuring the security of your WordPress site. Once you've installed your SSL certificate, you'll need to configure WordPress to use HTTPS. You can do this by adding the following code to your wp-config.php file:
define('FORCE_SSL_ADMIN', true) ;This will force WordPress to use HTTPS for all admin pages. You can also add the following code to force the use of HTTPS for all pages on your site:
define('FORCE_SSL', true) ;Once you've added the code to your wp-config.php file, you need to log in to your WordPress site and go to Settings » General. Here, you need to update your WordPress Address and Site Address fields to use HTTPS. Once you've completed these steps, your website will be accessible via a secure connection, and all data transmitted between the server and clients will be encrypted.
After switching to HTTPS
Check 301 redirects
One of the most important steps is setting up 301 redirects. This ensures that users and search engines are directed to the correct page, and that your site retains its rankings and traffic. There are two main methods for checking your 301 redirects: manually testing all your HTTP URLs or using a crawling tool like Screaming Frog. Both methods have their pros and cons, so it’s worth considering which one will best meet your needs.
If you have a small website, manual testing may be the fastest and most cost-effective option. On the other hand, if your site is large and has hundreds or even thousands of pages, a crawling tool will be essential to verify that all your redirects are in place. Regardless of the method you choose, verifying your 301 redirects is an essential part of the migration to HTTPS.
Edit URLs in analytics tools, Google Ads, and Search Console
First, update your WordPress URL in all the analytics or marketing tools you use, such as Google Analytics or Google Ads. Next, update your sitemap and submit it to Search Console. By declaring your new HTTPS URL , you ensure that traffic to your site is properly redirected. Finally, make sure that all of your site’s resources ( such as images, style sheets, and scripts) are also available over HTTPS.
Verify the validity of the overall installation
After completing all the steps above, it's time to test your site to make sure everything is working as it should:
- Check the validity of your site's SSL certificate using an online tool such as SSLCheck.
- Make sure that all content on your WordPress site is served over HTTPS, not HTTP.
- Test your WordPress site in a variety of browsers to ensure that it is accessible and secure for all users.
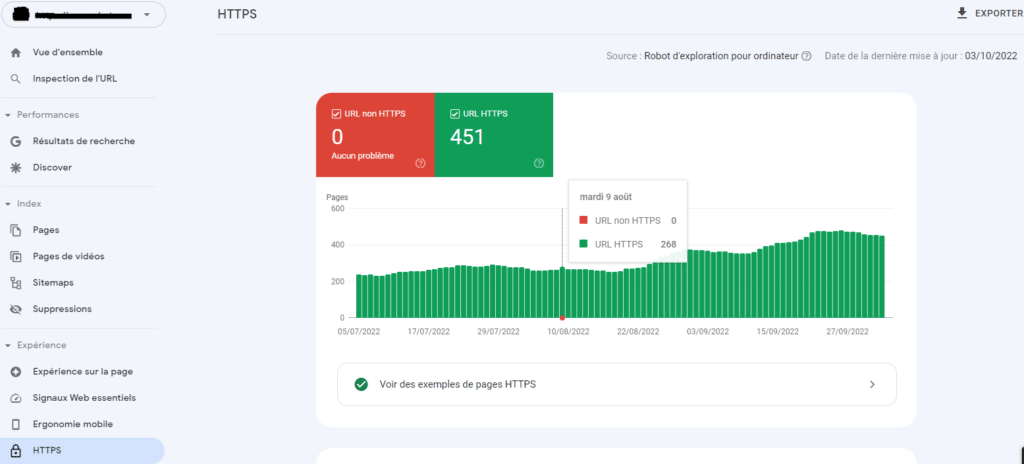
- Use the new Search Console report on indexing status by HTTP/HTTPS status.
How can Ingenius help you switch your WordPress site to HTTPS?
As any WordPress user knows , updating your site is important for security and performance. One of the most important updates you can make is switching from HTTP to HTTPS. However, making this change can be a bit complicated and time-consuming. That’s where theWordPress support fromIngenius comes in. Our team ofWordPress WordPress can handle every step of upgrading your WordPress site to HTTPS, from purchasing the SSL certificate to installation and verification. Contact us today to find out how we can help you upgrade your WordPress site to HTTPS quickly and easily.
In conclusion, is the HTTPS protocol useful for WordPress?
If you run a WordPress site, you must use HTTPS. This protocol encrypts traffic between your site and visitors’ browsers, ensuring that sensitive data such as passwords and credit card numbers cannot be intercepted by third parties. HTTPS also authenticates your site, which can help build visitor trust. This simple change can improve your site’s performance, as modern browsers prioritize loading secure resources. Finally, from an SEO perspective, Google will favor secure WordPress sites in its rankings.